1. Before you begin
Abstract
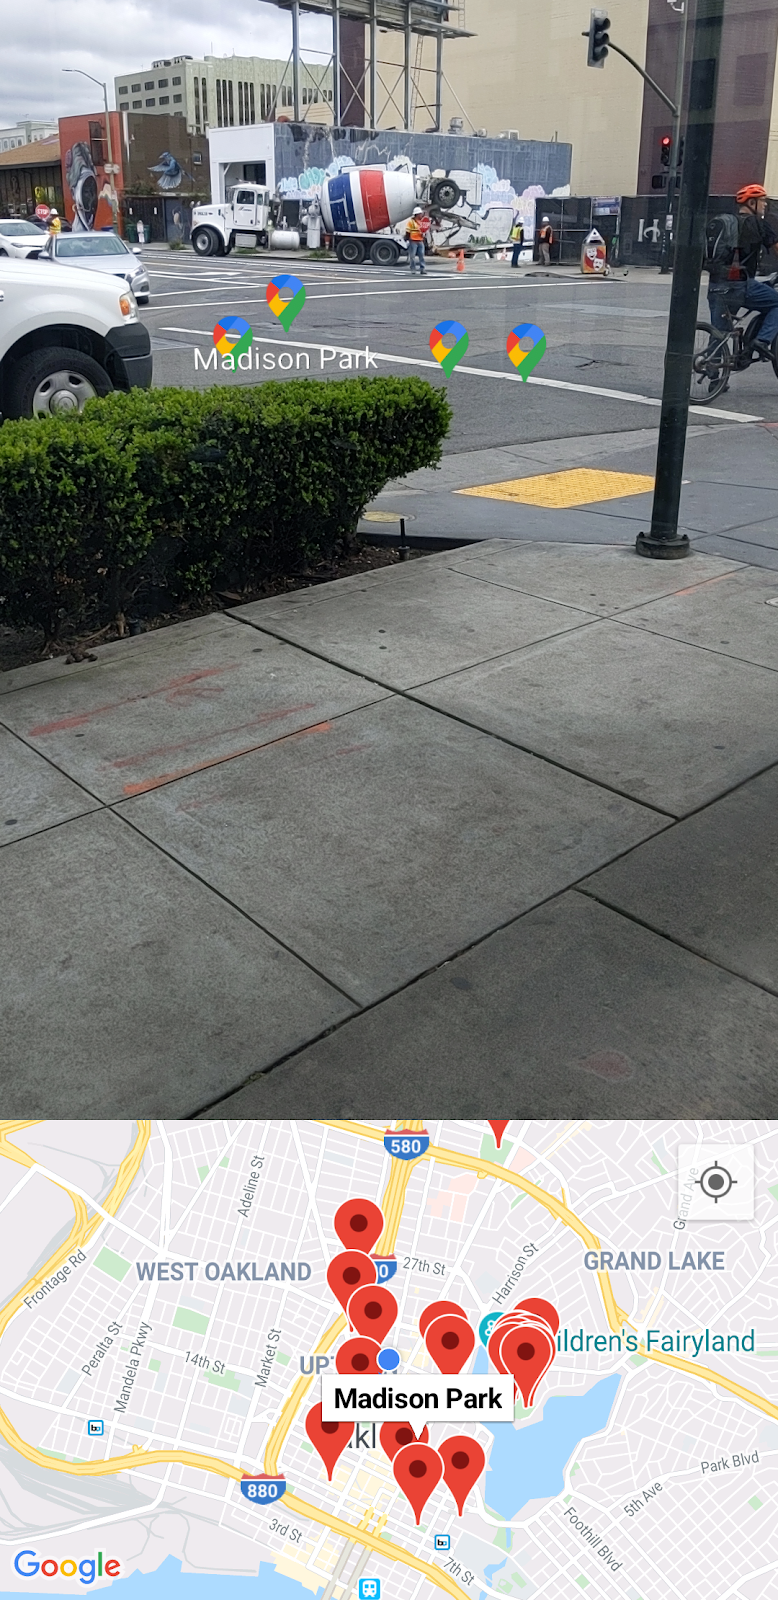
This codelab teaches you how to use data from Google Maps Platform to display nearby places in augmented reality (AR) on Android.
Prerequisites
- Basic understanding of Android development using Android Studio
- Familiarity with Kotlin
What you'll learn
- Request permission from the user to access the device's camera and location.
- Integrate with Places API to fetch nearby places around the device's location.
- Integrate with ARCore to find horizontal plane surfaces so that virtual objects can be anchored and placed in 3D space using Sceneform.
- Collect information about the device's position in space using SensorManager and use the Maps SDK for Android Utility Library to position virtual objects at the correct heading.
What you'll need
- Android Studio 2020.3.1 or higher
- A development machine that supports OpenGL ES 3.0 or higher
- An ARCore supported device or an ARCore enabled Android Emulator (instructions are provided in the next step)
2. Get set up
Android Studio
This codelab uses Android 10.0 (API level 29) and requires that you have Google Play services installed in Android Studio. To install both of these dependencies, complete the following steps:
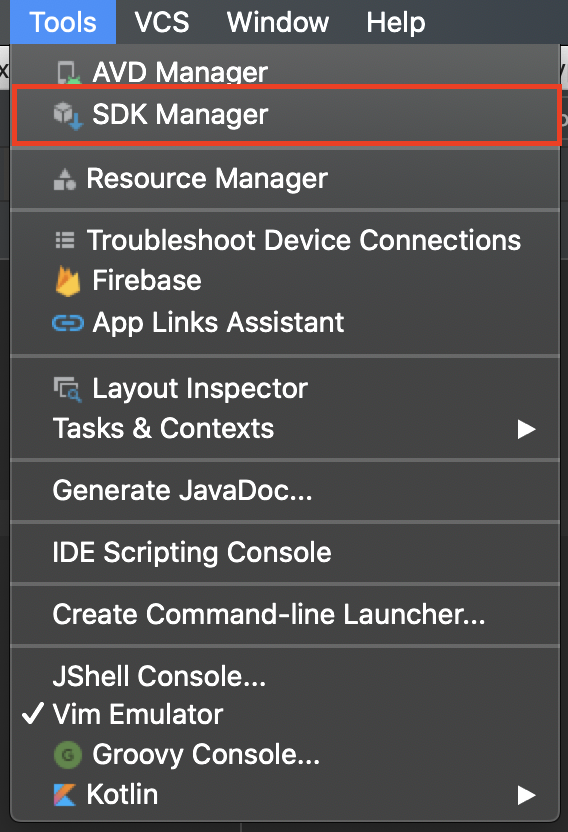
- Go to the SDK Manager, which you can access by clicking Tools > SDK Manager.
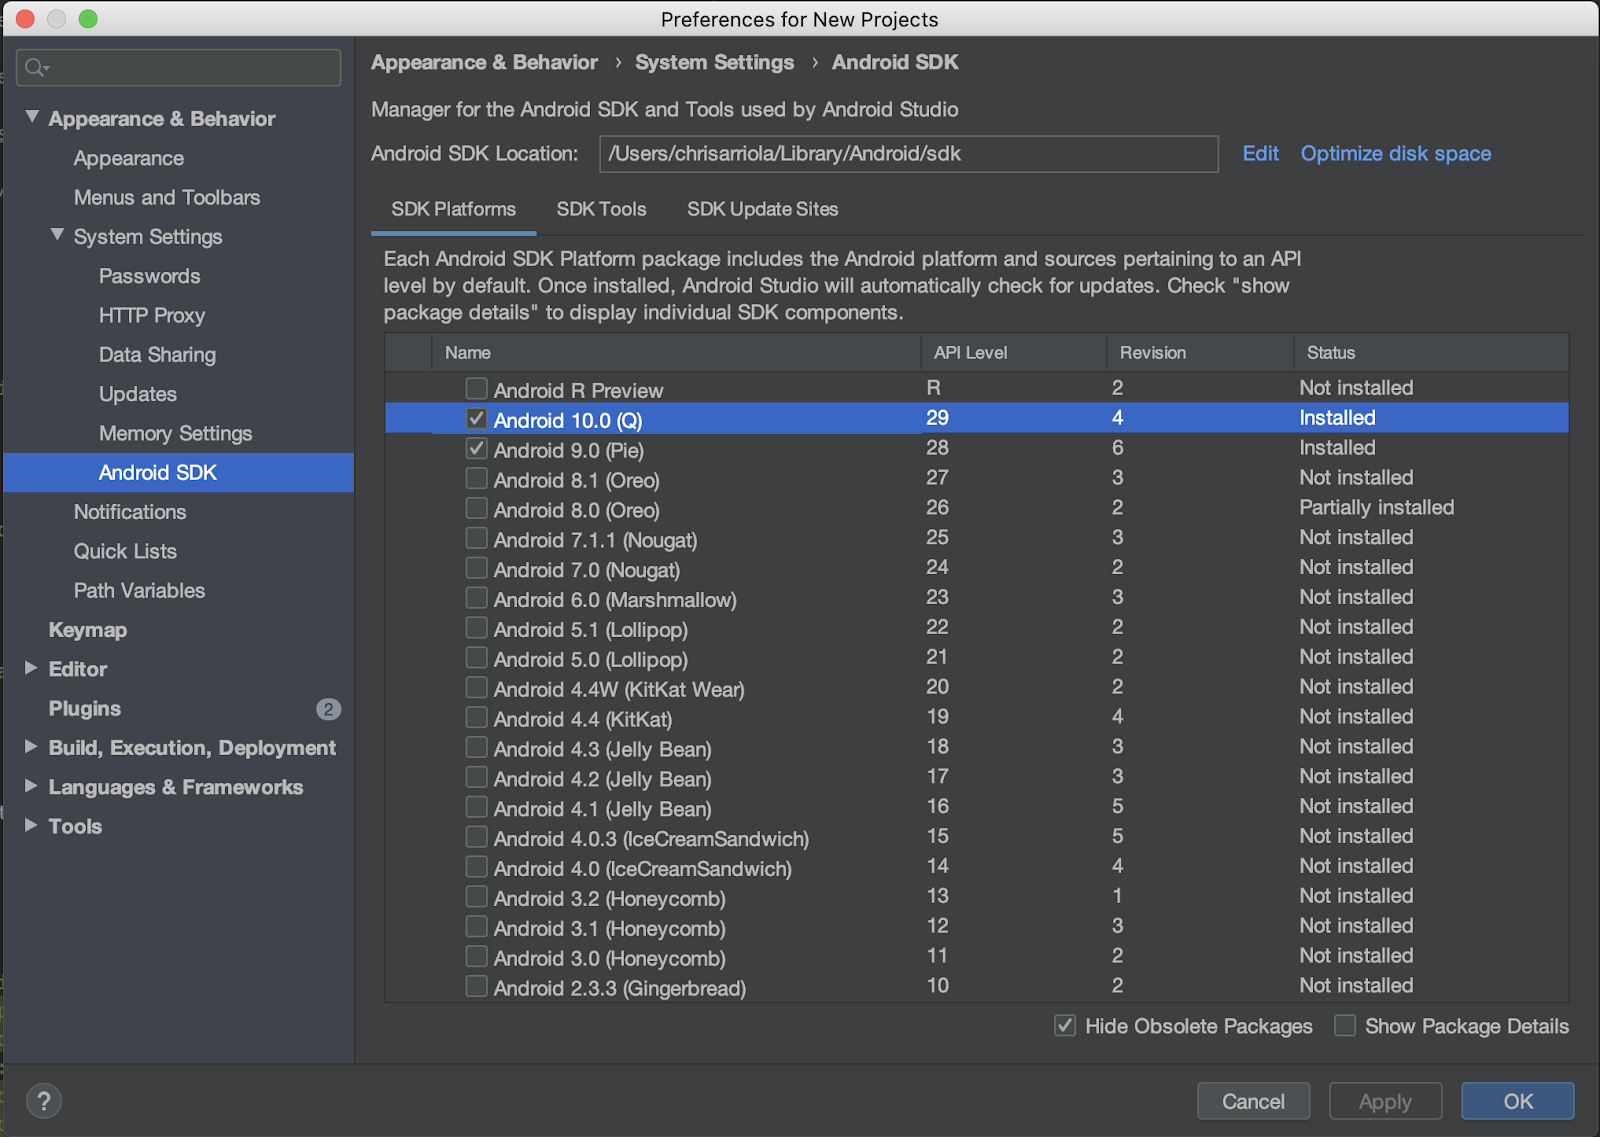
- Check if Android 10.0 is installed. If not, install it by selecting the checkbox next to Android 10.0 (Q), then click OK, and finally click OK again in the dialog that appears.
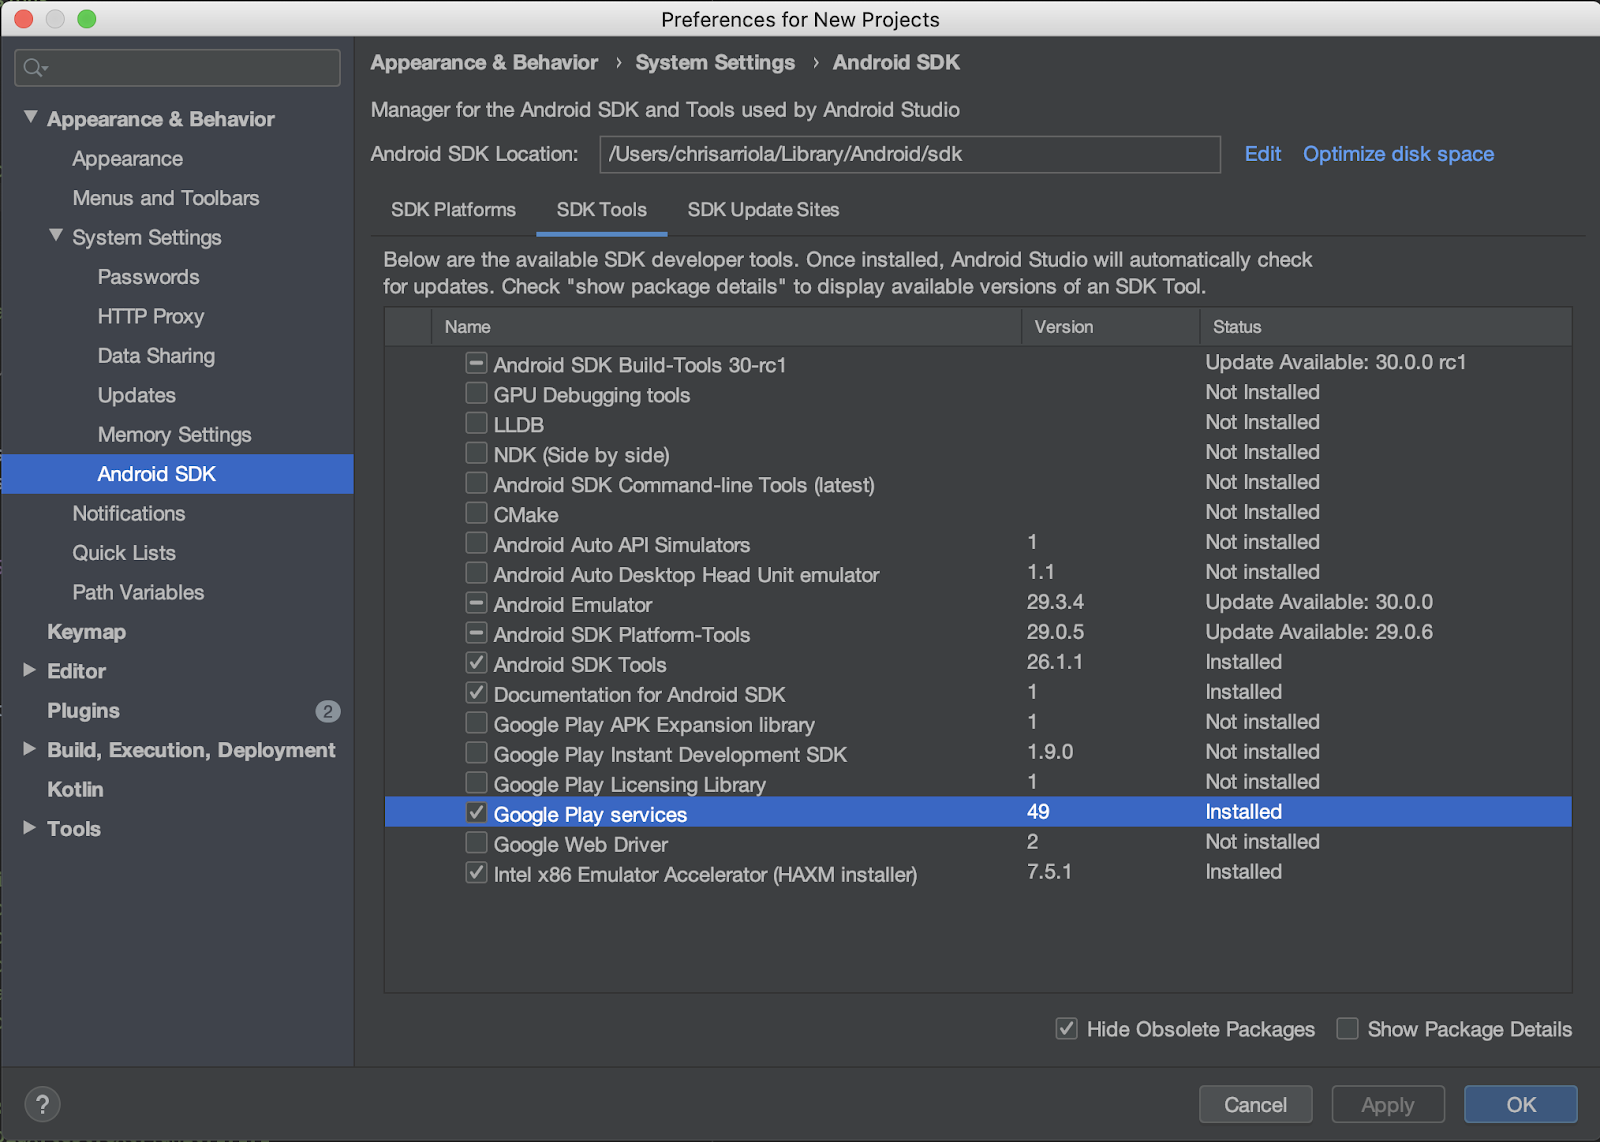
- Lastly, install Google Play services by going to the SDK Tools tab, select the checkbox next to Google Play services, click OK, then select OK again in the dialog that appears**.**
Required APIs
In Step 3 of the following section, enable Maps SDK for Android and Places API for this codelab.
Get started with Google Maps Platform
If you haven't used Google Maps Platform before, follow the Get Started with Google Maps Platform guide or watch the Getting Started with Google Maps Platform playlist to complete the following steps:
- Create a billing account.
- Create a project.
- Enable Google Maps Platform APIs and SDKs (listed in the previous section).
- Generate an API key.
Optional: Android Emulator
If you don't have an ARCore supported device, you can alternatively use the Android Emulator to simulate an AR scene as well as fake your device's location. Given that you'll also be using Sceneform in this exercise, you'll also need to make sure to follow the steps under "Configure the emulator to support Sceneform."
3. Quick start
To get you started as quickly as possible, here's some starter code to help you follow along this codelab. You're welcomed to jump to the solution, but if you want to see all the steps, keep reading.
You can clone the repository if you have git installed.
git clone https://github.com/googlecodelabs/display-nearby-places-ar-android.git
Alternatively, you can click the button below to download the source code.
Upon getting the code, go ahead and open the project found inside the starter directory.
4. Project overview
Explore the code you downloaded from the previous step. Inside this repository, you should find a single module named app, which contains the package com.google.codelabs.findnearbyplacesar.
AndroidManifest.xml
The following attributes are declared in the AndroidManifest.xml file to enable you to use features required in this codelab:
<uses-permission android:name="android.permission.INTERNET" />
<uses-permission android:name="android.permission.CAMERA" />
<uses-permission android:name="android.permission.ACCESS_FINE_LOCATION" />

<!-- Sceneform requires OpenGL ES 3.0 or later. -->
<uses-feature
   android:glEsVersion="0x00030000"
   android:required="true" />

<!-- Indicates that app requires ARCore ("AR Required"). Ensures the app is visible only in the Google Play Store on devices that support ARCore. For "AR Optional" apps remove this line. -->
<uses-feature android:name="android.hardware.camera.ar" />
For uses-permission, which specifies which permissions need to be granted by the user before those capabilities can be used, the following are declared:
android.permission.INTERNET—this is so that your app can make network operations and fetch data over the internet, such as places information via Places API.android.permission.CAMERA—camera access is required so that you can use the device's camera to display objects in augmented reality.android.permission.ACCESS_FINE_LOCATION—location access is needed so you can fetch nearby places relative to the device's location.
For uses-feature, which specifies which hardware features are needed by this app, the following are declared:
- OpenGL ES version 3.0 is required.
- ARCore capable device is required.
Additionally, the following metadata tags are added under the application object:
<application
  android:allowBackup="true"
  android:icon="@mipmap/ic_launcher"
  android:label="@string/app_name"
  android:roundIcon="@mipmap/ic_launcher_round"
  android:supportsRtl="true"
  android:theme="@style/AppTheme">

  <!--
     Indicates that this app requires Google Play Services for AR ("AR Required") and causes
     the Google Play Store to download and install Google Play Services for AR along with
     the app. For an "AR Optional" app, specify "optional" instead of "required".
  -->

  <meta-data
     android:name="com.google.ar.core"
     android:value="required" />

  <meta-data
     android:name="com.google.android.geo.API_KEY"
     android:value="@string/google_maps_key" />

  <!-- Additional elements here -->

</application>
The first meta-data entry is to indicate that ARCore is a requirement for this app to run and the second one is how you provide your Google Maps Platform API key to the Maps SDK for Android.
build.gradle
In build.gradle, the following additional dependencies are specified:
dependencies {
    // Maps & Location
    implementation 'com.google.android.gms:play-services-location:17.0.0'
    implementation 'com.google.android.gms:play-services-maps:17.0.0'
    implementation 'com.google.maps.android:maps-utils-ktx:1.7.0'

    // ARCore
    implementation "com.google.ar.sceneform.ux:sceneform-ux:1.15.0"

    // Retrofit
    implementation "com.squareup.retrofit2:retrofit:2.7.1"
    implementation "com.squareup.retrofit2:converter-gson:2.7.1"
}
Here's a brief description of each dependency:
- The libraries with the group ID
com.google.android.gms, namelyplay-services-locationandplay-services-maps, are used to access location information of the device and access functionality related to Google Maps. com.google.maps.android:maps-utils-ktxis the Kotlin extensions (KTX) library for the Maps SDK for Android Utility Library. Functionality will be used in this library to later position virtual objects in real space.com.google.ar.sceneform.ux:sceneform-uxis the Sceneform library, which will allow you to render realistic 3D scenes without having to learn OpenGL.- The dependencies within the group ID
com.squareup.retrofit2are the Retrofit dependencies, which enable you to quickly write an HTTP client to interact with the Places API.
Project structure
Here you'll find the following packages and files:
- **api—**this package contains classes that are used to interact with the Places API using Retrofit.
- **ar—**this package contains all files related to ARCore.
- **model—**this package contains a single data class
Place, which is used to encapsulate a single place as returned by the Places API. - MainActivity.kt—This is the single
Activitycontained within your app, which will display a map and a camera view.
5. Setting up the scene
Dive into the core components of the app starting with the augmented-reality pieces.
MainActivity contains a SupportMapFragment, which will handle displaying the map object, and a subclass of an ArFragment—PlacesArFragment—which handles displaying the augmented reality scene.
Augmented reality setup
Apart from displaying the augmented reality scene, PlacesArFragment will also handle requesting camera permission from the user if not already granted. Additional permissions can also be requested by overriding the getAdditionalPermissions method. Given that you also need location permission to be granted, specify that and override the getAdditionalPermissions method:
class PlacesArFragment : ArFragment() {

   override fun getAdditionalPermissions(): Array<String> =
       listOf(Manifest.permission.ACCESS_FINE_LOCATION)
           .toTypedArray()
}
Run it
Go ahead and open the skeleton code in the directory starter in Android Studio. If you click Run > Run ‘app' from the toolbar and deploy the app to your device or emulator, you should first be prompted to enable location and camera permission. Go ahead and click Allow and, upon doing so, you should see a camera view and a map view side-by-side like this:
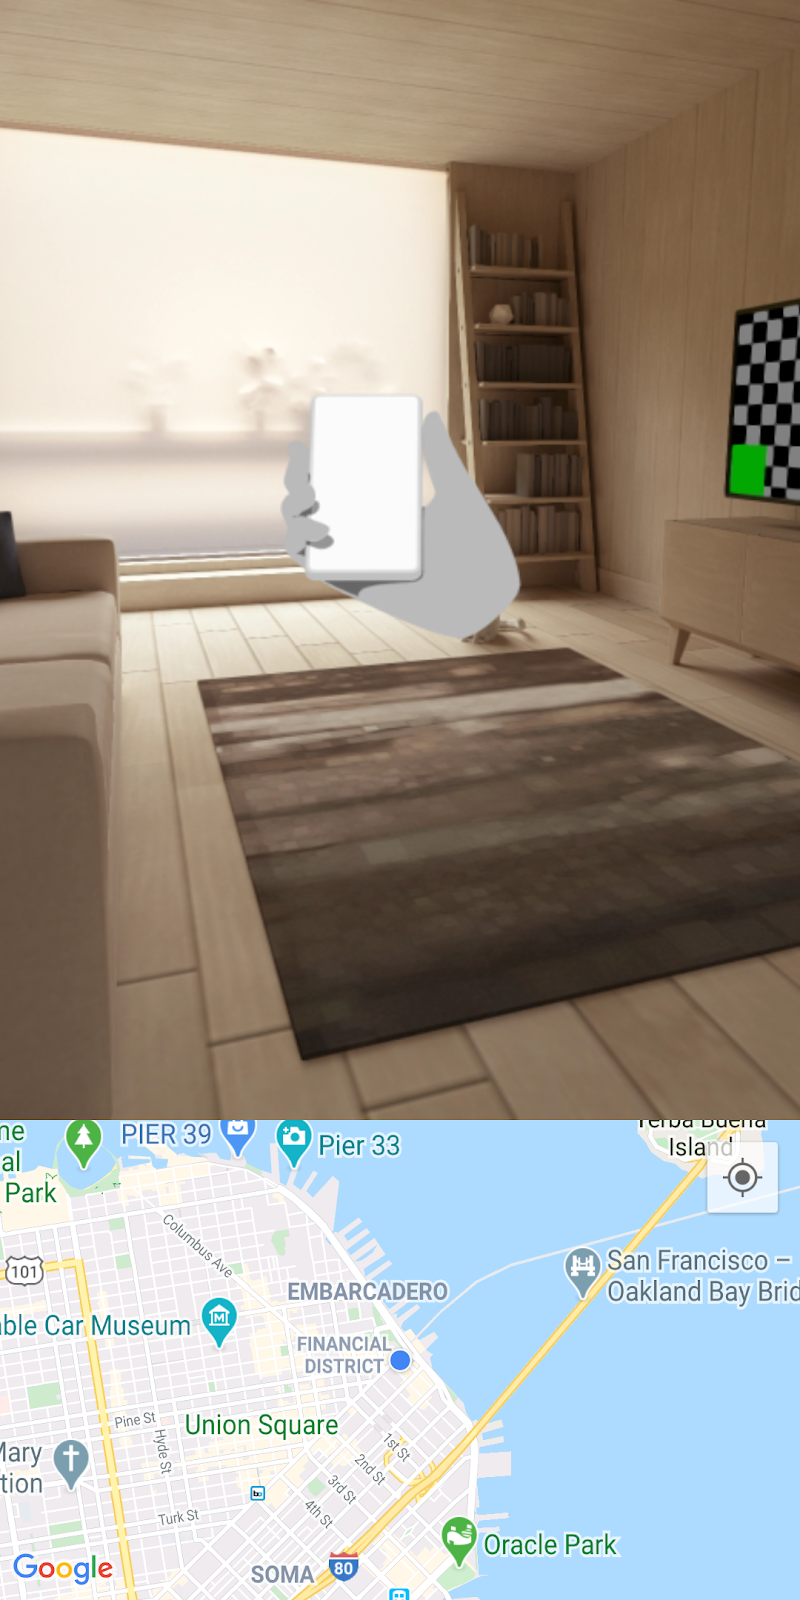
Detecting planes
Upon looking around the environment you're in with your camera, you might notice a couple of white dots overlaid on horizontal surfaces, kind of like the white dots on the carpet in this image.
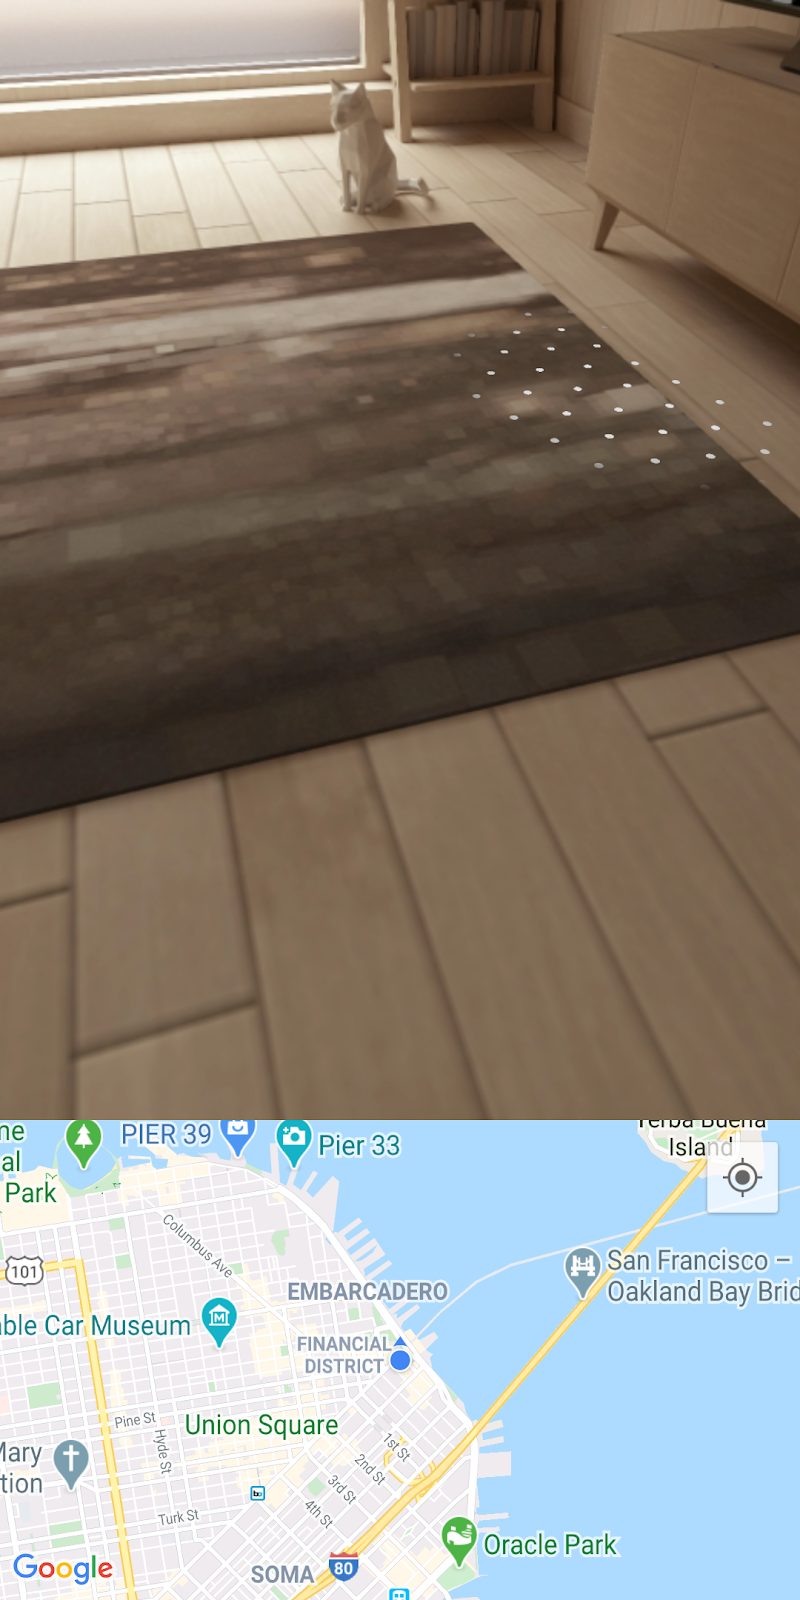
These white dots are guidelines provided by ARCore to indicate that a horizontal plane has been detected. These detected planes allow you to create what's called an "anchor" so that you can position virtual objects in real space.
For more information about ARCore and how it understands the environment around you, read about its fundamental concepts.
6. Get nearby places
Next, you'll need to access and display the device's current location followed by fetching nearby places using the Places API.
Maps setup
Google Maps Platform API key
Earlier, you created a Google Maps Platform API key to enable querying the Places API and to be able to use the Maps SDK for Android. Go ahead and open the gradle.properties file and replace the string "YOUR API KEY HERE" with the API key you created.
Display device location on map
Once you added your API key, add a helper on the map to assist with orienting users where they are relative to the map. To do so, navigate to the setUpMaps method and inside the mapFragment.getMapAsync call, set googleMap.isMyLocationEnabled to true. Doing so will show the blue dot on the map.
private fun setUpMaps() {
   mapFragment.getMapAsync { googleMap ->
       googleMap.isMyLocationEnabled = true
       // ...
   }
}
Get current location
To get the location of the device, you'll need to make use of the FusedLocationProviderClient class. Obtaining an instance of this has already been done in the onCreate method of MainActivity. To make use of this object, fill out the getCurrentLocation method, which accepts a lambda argument so that a location can be passed to the caller of this method.
To complete this method, you can access the lastLocation property of the FusedLocationProviderClient object followed by adding on an addOnSuccessListener as such:
fusedLocationClient.lastLocation.addOnSuccessListener { location ->
    currentLocation = location
    onSuccess(location)
}.addOnFailureListener {
    Log.e(TAG, "Could not get location")
}
The getCurrentLocation method is called from within the lambda provided in getMapAsync in the setUpMaps method from which the nearby places are fetched.
Initiate places network call
In the getNearbyPlaces method call, note that the following parameters are passed into the placesServices.nearbyPlaces method—an API key, the location of the device, a radius in meters (which is set to 2 km), and a place type (currently set to park).
val apiKey = "YOUR API KEY"
placesService.nearbyPlaces(
   apiKey = apiKey,
   location = "${location.latitude},${location.longitude}",
   radiusInMeters = 2000,
   placeType = "park"
)
To complete the network call, go ahead and pass in the API key that you defined in your gradle.properties file. The following code snippet is defined in your build.gradle file under the android > defaultConfig configuration:
android {
   defaultConfig {
       resValue "string", "google_maps_key", (project.findProperty("GOOGLE_MAPS_API_KEY") ?: "")
   }
}
This will make the string resource value google_maps_key available at build time.
To complete the network call, you can simply read this string resource via getString on the Context object.
val apiKey = this.getString(R.string.google_maps_key)
7. Places in AR
So far, you have done the following:
- Requested camera and location permissions from the user when first running the app
- Set up ARCore to start tracking horizontal planes
- Set up the Maps SDK with your API key
- Got the device's current location
- Fetched nearby places (specifically parks) using the Places API
The remaining step to complete this exercise is to position the places that you're fetching in augmented reality.
Scene understanding
ARCore is able to understand the real-world scene through the device's camera by detecting interesting and distinct points called feature points in each image frame. When these feature points are clustered and appear to lie on a common horizontal plane, like tables and floors, ARCore can make this feature available to the app as a horizontal plane.
As you saw earlier, ARCore helps guide the user when a plane has been detected by displaying white dots.

Adding anchors
Once a plane has been detected, you are able to attach an object called an anchor. Through an anchor, you can place virtual objects and guarantee that those objects will appear to stay in the same position in space. Go ahead and modify the code to attach one once a plane has been detected.
In setUpAr, an OnTapArPlaneListener is attached to the PlacesArFragment. This listener gets invoked whenever a plane is tapped in the AR scene. Within this call, you can create an Anchor and an AnchorNode from the provided HitResult in the listener as such:
arFragment.setOnTapArPlaneListener { hitResult, _, _ ->
   val anchor = hitResult.createAnchor()
   anchorNode = AnchorNode(anchor)
   anchorNode?.setParent(arFragment.arSceneView.scene)
   addPlaces(anchorNode!!)
}
The AnchorNode is where you will be attaching child node objects—PlaceNode instances—in the scene which is handled in the addPlaces method call.
Run it
If you run the app with the modifications above, look around you until a plane has been detected. Go ahead and tap on the white dots that indicate a plane. Upon doing so, you should now see markers on the map for all the nearest parks around you. However, if you'll notice, the virtual objects are stuck on the anchor that was created and not placed relative to where those parks are in space.
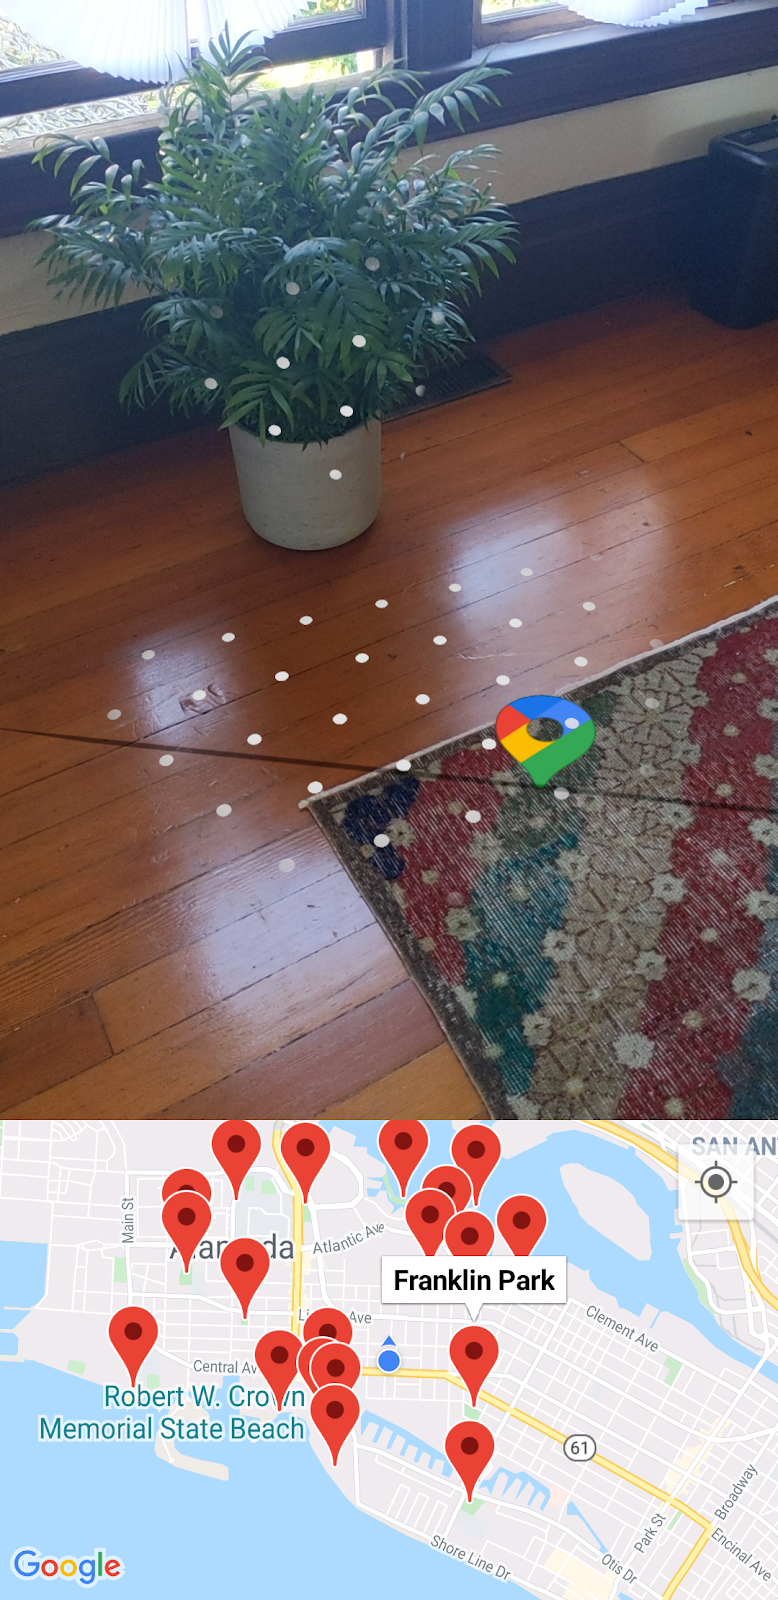
For your last step, you'll correct this by using the Maps SDK for Android Utility Library and SensorManager on the device.
8. Positioning places
To be able to position the virtual place icon in augmented reality to an accurate heading, you'll need two pieces of information:
- Where true north is
- The angle between north and each place
Determining north
North can be determined by using the position sensors (geomagnetic and accelerometer) available on the device. Using these two sensors, you can collect real-time information about the device's position in space. For more information about position sensors, read Compute the device's orientation.
To access these sensors, you'll need to obtain a SensorManager followed by registering a SensorEventListener on those sensors. These steps are already done for you in MainActivity's lifecycle methods:
override fun onCreate(savedInstanceState: Bundle?) {
   super.onCreate(savedInstanceState)
   // ...
   sensorManager = getSystemService()!!
   // ...
}

override fun onResume() {
   super.onResume()
   sensorManager.getDefaultSensor(Sensor.TYPE_MAGNETIC_FIELD)?.also {
       sensorManager.registerListener(
           this,
           it,
           SensorManager.SENSOR_DELAY_NORMAL
       )
   }
   sensorManager.getDefaultSensor(Sensor.TYPE_ACCELEROMETER)?.also {
       sensorManager.registerListener(
           this,
           it,
           SensorManager.SENSOR_DELAY_NORMAL
       )
   }
}

override fun onPause() {
   super.onPause()
   sensorManager.unregisterListener(this)
}
In the onSensorChanged method, a SensorEvent object is provided, which contains details about a given sensor's datum as it changes over time. Go ahead and add the following code into that method:
override fun onSensorChanged(event: SensorEvent?) {
   if (event == null) {
       return
   }
   if (event.sensor.type == Sensor.TYPE_ACCELEROMETER) {
       System.arraycopy(event.values, 0, accelerometerReading, 0, accelerometerReading.size)
   } else if (event.sensor.type == Sensor.TYPE_MAGNETIC_FIELD) {
       System.arraycopy(event.values, 0, magnetometerReading, 0, magnetometerReading.size)
   }

   // Update rotation matrix, which is needed to update orientation angles.
   SensorManager.getRotationMatrix(
       rotationMatrix,
       null,
       accelerometerReading,
       magnetometerReading
   )
   SensorManager.getOrientation(rotationMatrix, orientationAngles)
}
The code above checks the sensor type and, depending on the type, will update the appropriate sensor reading (either the accelerometer or magnetometer reading). Using these sensor readings, the value of how many degrees from north relative to the device can now be determined (i.e. the value of orientationAngles[0]).
Spherical heading
Now that north has been determined, the next step is to determine the angle between north and each place followed by using that information to position the places in the correct heading in augmented reality.
To compute the heading, you'll use the Maps SDK for Android Utility Library, which contains a handful of helper functions for computing distances and headings via spherical geometry. For more information, read this overview of the library.
Next, you will make use of the sphericalHeading method in the utility library, which computes the heading/bearing between two LatLng objects. This information is needed inside the getPositionVector method defined in Place.kt. This method will ultimately return a Vector3 object, which will then be used by each PlaceNode as its local position in AR space.
Go ahead and replace the heading definition in that method with the following:
val heading = latLng.sphericalHeading(placeLatLng)
Doing so should result in the following method definition:
fun Place.getPositionVector(azimuth: Float, latLng: LatLng): Vector3 {
   val placeLatLng = this.geometry.location.latLng
   val heading = latLng.sphericalHeading(placeLatLng)
   val r = -2f
   val x = r * sin(azimuth + heading).toFloat()
   val y = 1f
   val z = r * cos(azimuth + heading).toFloat()
   return Vector3(x, y, z)
}
Local position
The last step to orient places correctly in AR is to use the result of getPositionVector when PlaceNode objects are being added to the scene. Go ahead and navigate to addPlaces in MainActivity, right below the line where the parent is set on each placeNode (right below placeNode.setParent(anchorNode)). Set the localPosition of the placeNode to the result of calling getPositionVector like so:
val placeNode = PlaceNode(this, place)
placeNode.setParent(anchorNode)
placeNode.localPosition = place.getPositionVector(orientationAngles[0], currentLocation.latLng)
By default, the method getPositionVector sets the y distance of the node to 1 meter as specified by the y value in the getPositionVector method. If you want to adjust this distance, say to 2 meters, go ahead and modify that value as needed.
With this change, added PlaceNode objects should now be oriented in the correct heading. Now go ahead and run the app to see the result!
9. Congratulations
Congratulations on getting this far!
