To enable run-time changes to your Google Analytics implementation that do not require you to rebuild and resubmit your app binary to marketplaces, implement Universal Analytics (UA) in your app with Google Tag Manager (GTM).
This guide shows you how to use Universal Analytics tags and the Google Tag Manager SDK for iOS to:
Send screen views
To send a screen view each time a new screen is opened in your app to Google Analytics:
- Create a screen name variable.
- Create an open screen event trigger.
- Create a Universal Analytics screen view tag.
- Push open screen event and screen name to data layer.
1. Create a screen name variable
To create a screen name variable in GTM:
- Sign in to your Google Tag Manager account.
- Select a mobile container.
- On the left navigation bar, click Variables.
- Under User-Defined Variables, click New.
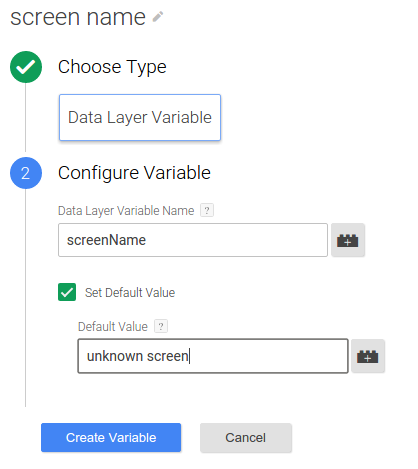
- Click Untitled Variable to enter the variable name screen name.
- Choose Data Layer Variable as the variable type.
- Enter screenName as the Data Layer Variable Name and set its default value unknown screen.
- Click Create Variable.
2. Create an open screen event trigger
To create a trigger in GTM to fire the Universal Analytics screen view tag:
- Sign in to your Google Tag Manager account.
- Select a mobile container.
- On the left navigation bar, click Triggers.
- Click New.
- Click Untitled Trigger to enter the trigger name OpenScreenEvent.
- Choose Custom event.
- Under Fire On, enter the following condition:

- Click Create Trigger.
3. Create a Universal Analytics screen view tag
To create a Universal Analytics screen view tag fired by the open screen event:
- Sign in to your Google Tag Manager account.
- Select a mobile container.
- On the left navigation bar, click Tags.
- Click New.
- Click Untitled Tag to enter the tag name Open Screen.
- Choose product Google Analytics.
- Enter the tracking ID.
- Select App View as the Track Type.
- Click More settings.
- Click Fields to Set.
- Repeatedly click + Add Field to add the following fields:

- Click Continue.
- Under Fire On, click Custom.
- Select the custom trigger OpenScreenEvent.
- Click Save.
- Click Create Tag.
4. Push open screen event and screen name to data layer
Add code to your app to push an openScreen event and a
screenName value to the data layer, for example:
//  ViewController.m
//  Push an 'openScreen' event to the data layer.
//
#import "ViewController.h"
#import "TAGDataLayer.h"
#import "TAGManager.h"

@implementation ViewController

- (void)viewDidAppear {
    [super viewDidAppear];

    // NOTE: A GTM container should already have been opened, otherwise events
    //     pushed to the DataLayer will not fire tags in that container.
    TAGDataLayer *dataLayer = [TAGManager instance].dataLayer;

    [dataLayer push:@{@"event": @"openScreen",          // Event, name of Open Screen Event.
                      @"screenName": @"Home Screen"}];  // Name of the screen name field, screen name value.
}

// Rest of the ViewController implementation

@end
Send events
To send an event to Google Analytics when a user interacts with UI controls or content in your app:
- (Optional) Create event variables.
- Create an event trigger.
- Create a Universal Analytics event tag.
- Push event and event variable value to data layer.
The following steps show how an event is sent to Google Analytics when a user starts a video playback.
1. (Optional) Create event variables
If the event uses data layer variables to represent its category, action, label, or value fields, you must first create those variables. In this example, the video play event tag uses a data layer variable to get the name of the video.
To create a video name variable in GTM:
- Sign in to your Google Tag Manager account.
- Select a mobile container.
- On the left navigation bar, click Variables.
- Under User-Defined Variables, click New.
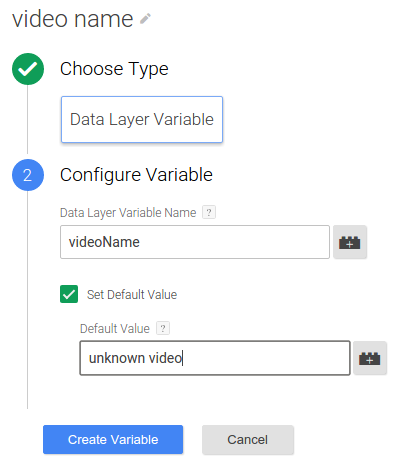
- Click Untitled Variable to enter the variable name video name.
- Choose Data Layer Variable as the variable type.
- Enter videoName as the Data Layer Variable Name and set its default value to unknown video.
- Click Create Variable.
2. Create an event trigger
To create an event trigger in GTM to fire the Universal Analytics event tag:
- Sign in to your Google Tag Manager account.
- Select a mobile container.
- On the left navigation bar, click Triggers.
- Click New.
- Click Untitled Trigger to enter the trigger name VideoPlayEvent.
- Choose Custom event.
- Under Fire On, enter the following condition:

- Click Create Trigger.
3. Create a Universal Analytics event tag
To create a Universal Analytics event tag fired by the video play event:
- Sign in to your Google Tag Manager account.
- Select a mobile container.
- On the left navigation bar, click Tags.
- Click New.
- Click Untitled Tag to enter the tag name Video Play Event.
- Choose product Google Analytics.
- Enter the tracking ID.
- Select Event as the Track Type.
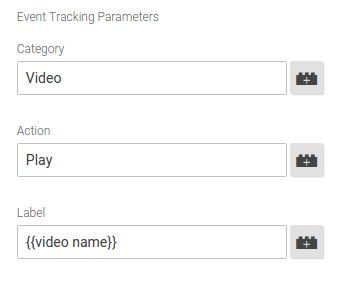
- Enter the following event tracking parameters:

- Click More settings.
- Click Fields to Set.
- Repeatedly click + Add Field to add the following fields:

- Click Continue.
- Under Fire On, click Custom.
- Select the custom trigger VideoPlayEvent.
- Click Save.
- Click Create Tag.
4. Push event and event variable value to data layer
Write code to push a videoPlay event and a
videoName value to the data layer, for example:
//  VideoPlayer.m
//  Push a 'videoPlay' event to the data layer.
//
#import "TAGDataLayer.h"
#import "TAGManager.h"
#import "Video.h"
#import "VideoPlayer.h"

@implementation VideoPlayer
// Called when a user initiates a video playback.
- (void)onPlay:(Video *)video {

    TAGDataLayer *dataLayer = [TAGManager instance].dataLayer;

    // This call assumes the container has already been opened, otherwise events
    // pushed to the DataLayer will not fire tags in that container.
    [dataLayer push:@{@"event": @"videoPlay",          // Event, name of Video Play Event.
                      @"videoName": video.title,       // Additional data layer variables used by the event tag.
                      @"screenName": @"Home Screen"}];

    [self play:video];
}

// Rest of the implementation
@end
Send ecommerce transactions
When a user completes an in-app purchase, to send the transaction and the associated items to Google Analytics:
- Create a transaction trigger.
- Create a Universal Analytics transaction tag.
- Push transaction event, transaction, and items to data layer.
For the list of supported transaction and item variable names, see Supported ecommerce data layer variables.
1. Create a transaction trigger
To create transaction trigger in GTM to fire the Universal Analytics transaction tag:
- Sign in to your Google Tag Manager account.
- Select a mobile container.
- On the left navigation bar, click Triggers.
- Click New.
- Click Untitled Trigger to enter the trigger name TransactionCompleted.
- Choose Custom event.
- Under Fire On, enter the following condition:

- Click Create Trigger.
2. Create a Universal Analytics transaction tag
To create a Universal Analytics transaction tag fired by the transaction event:
- Sign in to your Google Tag Manager account.
- Select a mobile container.
- On the left navigation bar, click Tags.
- Click New.
- Click Untitled Tag to enter the tag name Transaction Completed.
- Choose product Google Analytics.
- Enter the tracking ID.
- Select Transaction as the Track Type.
- Click More settings.
- Click Fields to Set.
- Repeatedly click + Add Field to add the following fields:

- Click Continue.
- Under Fire On, click Custom.
- Select the custom trigger TransactionCompleted.
- Click Save.
- Click Create Tag.
3. Push transaction event, transaction, and items to data layer
Write code to push the transaction event, transaction and the associated items to the data layer. You must use the supported transaction and item variable names to push transaction and item data to the data layer. For example:
// Called when a user completes a transaction.
- (void)onPurchaseCompleted:(Purchase *)purchase {

  TAGDataLayer *dataLayer = [TAGManager instance].dataLayer;

  // An array to store dictionaries of item data.
  NSMutableArray *purchasedItems = [NSMutableArray array];

  // Push item data into dictionaries and store in the purchasedItems array.
  // Note that item.price and item.quantity must be of type NSString.
  for (id item in purchase.items) {
    [purchasedItems addObject:@{@"name": item.name,
                                @"sku": item.sku,
                                @"category": item.category,
                                @"price": item.price,
                                @"currency": @"USD",
                                @"quantity": item.quantity}];
  }

  // This call assumes the container has already been opened, otherwise events
  // pushed to the DataLayer will not fire tags in that container.
  // Note that purchase.tax, purchase.shipping, and purchase.total must be of type NSString.
  [dataLayer push:@{@"event": @"transaction",                  // Event, name of Transaction Event.
                    @"transactionId": purchase.transactionId,  // Additional fields required by the tag.
                    @"transactionTotal": purchase.total,
                    @"transactionAffiliation": @"In-app Store",
                    @"transactionTax": purchase.tax,
                    @"transactionShipping": purchase.shipping,
                    @"transactionCurrency": @"USD",
                    @"transactionProducts": purchasedItems}];

  // Since the data layer is persistent, you should reset fields to [NSNull null] after
  // you are done pushing the transaction.
  [dataLayer push:@{@"transactionId": [NSNull null],
                    @"transactionTotal": [NSNull null],
                    @"transactionAffiliation": [NSNull null],
                    @"transactionTax": [NSNull null],
                    @"transactionShipping": [NSNull null],
                    @"transactionCurrency": [NSNull null],
                    @"transactionProducts": [NSNull null]}];
}
For more information on using the Google Tag Manager SDK for Android to implement Universal Analytics Enhanced Ecommerce features, see Enhanced Ecommerce.
Supported ecommerce data layer variables
Universal transaction tags support the following transaction and item variable names.
Transaction variables
| Variable Name | Description | Type | Required |
|---|---|---|---|
transactionId |
Unique transaction identifier | string | Yes |
transactionAffiliation |
Partner or store | string | No |
transactionTotal |
Total value of the transaction | string | No |
transactionTax |
Tax amount for the transaction | string | No |
transactionShipping |
Shipping cost for the transaction | string | No |
transactionCurrency |
Currency of the transaction | string | No |
transactionProducts |
List of items purchased in the transaction | an array of item variables. | No |
Item variables
| Variable Name | Description | Type | Required |
|---|---|---|---|
name |
Product name | string | Yes |
sku |
Product SKU | string | No |
category |
Product category | string | No |
price |
Product price | string | No |
currency |
The currency type of price |
string | No |
quantity |
Quantity of items | string | No |
Send enhanced ecommerce data
To learn about sending Enhanced Ecommerce data, see the Enhanced Ecommerce Developer Guide.


