Last updated: August 13, 2024
- The device under test ("DUT") must be a factory-clean device (i.e., the DUT cannot be a personal device or a device that contains any personal information).
- The test materials available here (e.g., processes, guidelines, and other information) are part of Google services, subject to Google's intellectual property rights and subject to the Google Terms of Service located at http://www.google.com/accounts/TOS as if they were "software."
1. Preparation for Certification
1.1 Definition
Initial pairing is the sequence of events that occur when a user pairs a device to a Google Account signed-in on phone for the very first time. In this sequence, a phone detects the advertisement from the device and displays a notification prompting the user to connect to and save the device. (In this guideline, 'device' means the Bluetooth headset or speaker instead of a reference phone).
Subsequent pairing is the sequence of events that occur when a user signs into their Google Account on a new phone and attempts to pair a device already saved to their Google Account. In this sequence, the new phone recognizes that the advertised Model ID is already saved to the user's Google Account and provides a notification to expedite pairing the device to this phone.
1.2 Requirements
- All phones should be connected to the Internet and have Bluetooth and Location turned on in Settings.
- All phones should be logged in to the same Google Account.
- Reference phones should be phones actively on the market and cover a reasonably large population of users.
- A Bluetooth device implementing the version of Fast Pair, and associated extensions, that are to be certified.
Classic with A2DP+HPF
- Three (3) reference phones with three (3) different versions of Android. The Android OS versions must be at least Version 11.
- Suggested reference phones to cover all Android OS versions:
- Google Pixel 8 (Android 15)
- Samsung S23 or later running Android 14
- Google Pixel 7 (Android 13)
- Google Pixel 6 (Android 12)
- Google Pixel 5 (Android 11)
- Samsung S20 or a later running Android 12 or 13
BLE with Data Only
- Five (5) reference phones with three (3) different versions of Android. The Android OS versions must be at least Version 11.
- Suggested reference phones to cover all Android OS versions:
- Google Pixel 8 (Android 15)
- Samsung S23 or later running Android 14
- Google Pixel 7 (Android 13)
- Google Pixel 6 (Android 12)
- Google Pixel 5 (Android 11)
- Samsung S20 or a later running Android 12 or 13
BLE with LE Audio
- Five (5) reference phones with three (3) different versions of Android. The Android OS versions must be at least Version 11.
- Suggested reference phones to cover all Android OS versions:
- Google Pixel 8 (Android 15)
- Samsung S23 or later running Android 14
- Google Pixel 7 (Android 13)
- Google Pixel 6 (Android 12)
- Google Pixel 5 (Android 11)
- Samsung S20 or a later running Android 12 or 13
1.3 Check Google Play Service version
Purpose: To confirm the correct GMS Core version is used for testing.
Go to Settings > Google > Question mark on the right corner > Three dots on right corner >"Version info", then check Google Play services version (It should be
22.XX.XXor higher).

1.4 Enable debug mode ID
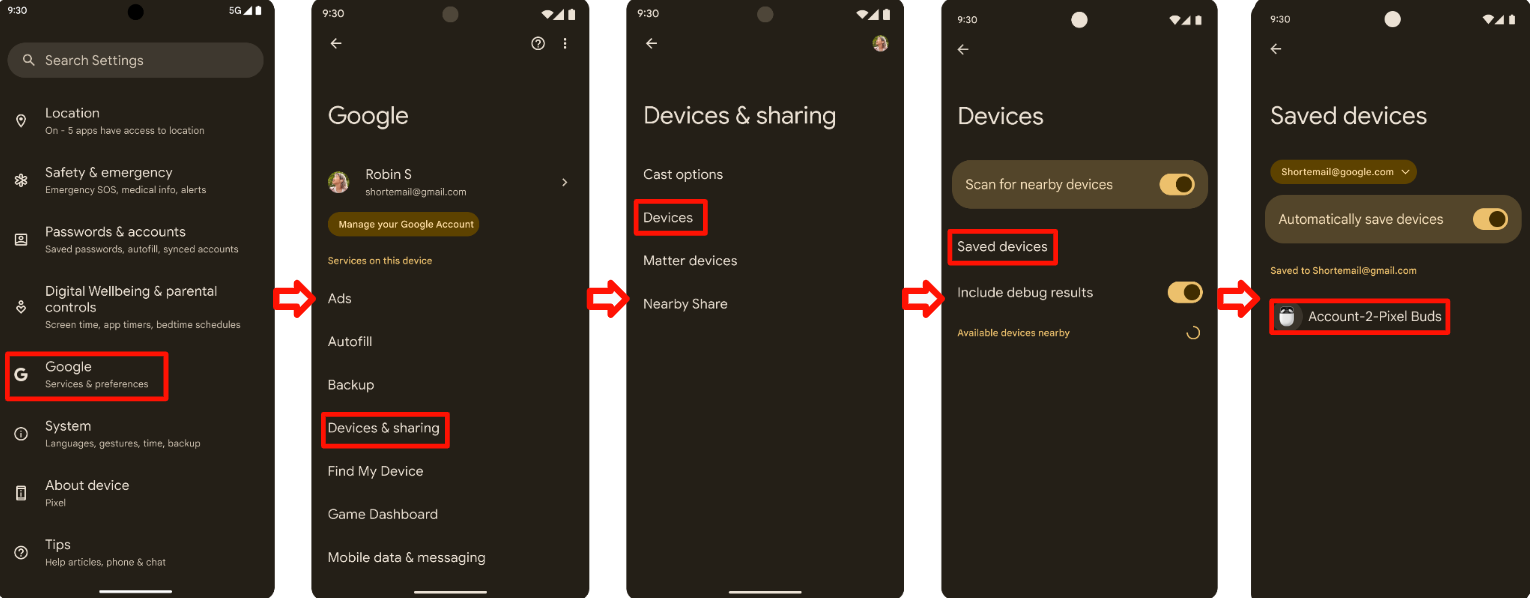
- The model ID provided to you is a debug mode ID. To enable it, go to Settings > Google > Devices & Sharing > Devices to enable "Include debug results". If the option "Include debug results" is missing in this page, verify that Developer options in the Seeker is enabled.

1.5 Enable Google Play services notifications
- Go to Settings > Notifications > App settings > Google Play services and ensure the switch Notifications is on.

1.6 Ensure you can reach the test result server
Some test data is uploaded directly to Google servers. This data is required to complete Self-Testing prior to starting Lab Certification. Ensure your test phone has the following:
- A logged-in test account that has joined the FP test group.
- The ability to stay powered and connected to the internet for 25 hours during and after running the initial and subsequent pairing tests. The phone will be attempting to upload test data and results during this time.
- A testing period and testing model ID matching the values provided in the BT Classic or BT LE Audio Self-Test Report.
- Usage & diagnostics settings enabled on the test device. This can be verified by navigating to: Settings > Google > 3 dots at top right corner > Usage & diagnostics > turn on usage & diagnostics.
2. Certification Criteria
2.1 Definitions
- "All phones" refers to all reference phones with an OS matching the minimum versions defined in the Requirements section.
- "Average pairing time" is (the sum of all the successful pairing times) / (10 - the number of failed pairings). Pairing time calculation starts when the user taps the Fast Pair notification, and ends when the phone displays a 'successful connection' notification to the user.
- "Success rate" for distance testing is (the number of notification pop up within 1 min / 10).
2.2 Notification popup for initial pairing
- The notification should pop up within 5 seconds.
2.3 Certification specification for pairing
- Each reference phone will be tested for initial and subsequent pairings 100 times respectively.
The success rate for initial and subsequent pairing is measured by placing the device 0.3 meters away from the reference phone.
- Average pairing time must be within 12 seconds when pairing firmware supporting just one component (e.g. a headset or single speaker).
- Average pairing time must be within 14 seconds when pairing firmware supporting Coordinated set members (e.g. left and right earbuds).
Classic with A2DP+HPF
- Initial and subsequent pass rate must be at least 95%.
BLE with Data Only
- Initial and subsequent pass rate must be at least 90%.
BLE with LE Audio
- Initial and subsequent pass rate must be at least 90%.
80% of all reference phone's initial and subsequent pairing time must meet the criteria.
2.4 Certification specification for distance
At least 80% of all reference phones must meet the criteria of this section when tested at the 3 proscribed distances (0.3 meters, 1.2 meters, and 2 meters).
- The success rate at 0.3 meters must be 100%. In other words, each reference phone must run the 0.3 meters test 10 times and show every notification.
- The pairing notification appearance rate sent to reference phones at 1.2 meters must be less than or equal to 20% in 10 times.
- Each test performed at a 2 meter distance must never cause a notification to appear on the reference phones for at least 1 minute.
- Each distance will be tested 10 times for each reference phone.
3. Fast Pair 2.0 Testing Guideline
3.1 User interface
The following images describe 4 different paring flow:
- Initial Pairing without the device's Companion App downloaded.

- Initial Pairing with the device's Companion App downloaded.

- Subsequent Pairing with the device's Companion App downloaded.
Subsequent Pairing without the device's Companion App downloaded.
Cases 3 and 4 use the same flow.

- Error status

The notification to download a companion app will only appear if the Model ID of the DUT is associated with a companion app link. Instead, if no companion app association exists, the tester will only see the device name under "Device connected" notification like they will see for subsequent pairings.
3.2 Test case 1: Initial pairing
3.2.1 Setup & Test
- Ensure the DUT doesn't appear as a saved device on any phone. On every phone that has saved the DUT and is logged in to the test Google Account: go to Bluetooth settings, choose "Forget Device", and toggle Airplane mode to ensure the DUT is forgotten.
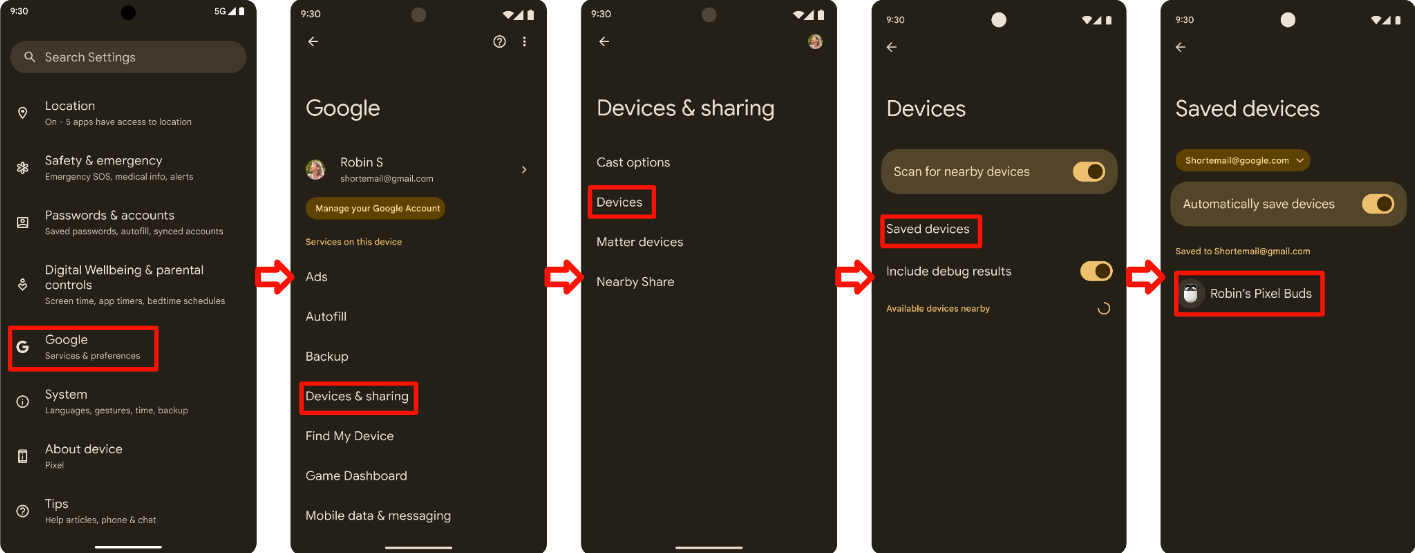
Ensure "Automatically save devices" is ON. This switch is OFF by default. You can find this option in Settings > Google > Devices > Saved devices of phone A.
Classic with A2DP+HPF
No additional steps required.
BLE with Data Only
No additional steps required.
BLE with LE Audio
- Navigate to Settings > Connected devices > Device details
- Verify that the LE Audio toggle is set to "Disabled".
- Phones only supporting Bluetooth Classic (like the Pixel 6 and older) won't have this toggle in their menu settings.
- For the phones supporting LE Audio used in testing:
- Navigate to Settings > Connected devices > Device details
- Verify that the LE Audio toggle is set to "Enabled".
Put the Bluetooth device in pairing mode.
Place the Bluetooth device 0.3m away from the phone A.
Wait for notification pop up in the reference phone A. The notification should pop up within 5 seconds.
Start timing since tapping the initial notification until you see the notification pop up 'Device connected' in phone A.
Record the time in Initial pairing section of test report.
3.2.2 Expected behavior
- Initial pairing half sheet appears:

- Tap the notification to start Fast Pair pairing. The notification will show progress:

- The phone will display a notification when Fast Pair pairing succeeds. The phone will also prompt the user to download the device's companion app from the Google Play store if the device maker releases a companion app.

- The phone will display an error if Fast Pair pairing fails:
3.3 Test case 2: Pair this device to two reference phones signed in to the same Google-account (Subsequent pairing)
3.3.1 Setup & Test
- Sign in to the same Google Account on both phones (phone A and phone B).
Ensure the DUT previously been paired with the other phone (phone A).
To verify that the Bluetooth device has been paired with phone A:
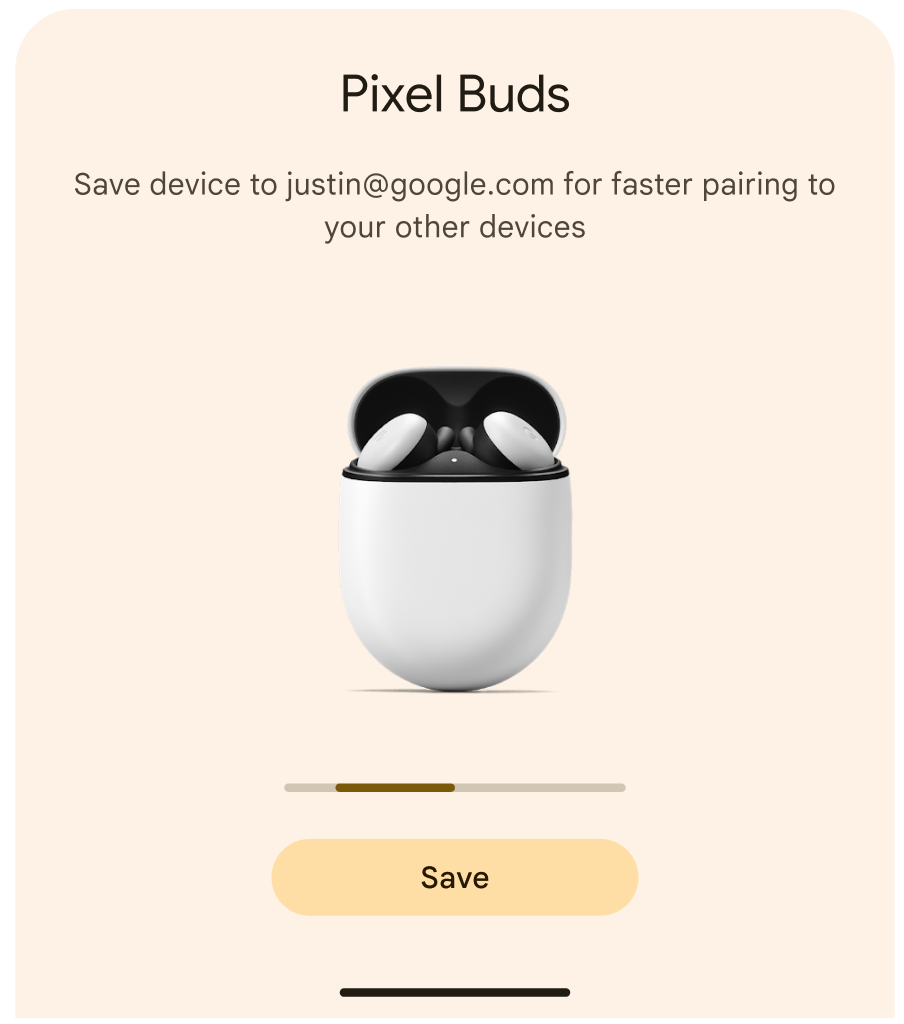
- First, navigate to Settings > Google > Devices & sharing (or Device connections) > Devices > Saved devices on the phone that performed the initial pairing (phone A). The DUT should appear in the phone's saved devices list, like depicted here:

- Second, navigate to Settings > Google > Devices & sharing (or Device connections) > Devices > Saved devices on the device that has not paired with the DUT (phone B). Phone B will be able to display the subsequent pairing notification only if the DUT also appears in its saved devices list.
Basically, after you run Test Case 1 (Initial Pairing) with phone A, you use the other reference phone B with the same account to verify this Test Case 2 (Subsequent Pairing).
Classic with A2DP+HPF
No additional steps required.
BLE with Data Only
No additional steps required.
BLE with LE Audio
- When testing the extensions features on a LE Audio capable device, the tests
must be run with the LE Audio toggle set ON and OFF on the reference phone.
- This verifies that the device can connect to the reference phone using both L2CAP (When LE Audio is ON) and RFCOMM (when LE Audio is OFF).
- When testing a LE Audio capable device, the phones need to be arranged in
the following configurations:
- Phone A supports LE Audio.
- Phone B does not support LE Audio.
- Phone C does not support LE Audio.
- Phone D supports LE Audio.
- When testing subsequent pairing for a LE Audio capable device, the tests
must be run for the following combinations of test devices:
- The subsequent pairing notifications must appear correctly between LE
Audio and non-LE Audio capable phones.
- For example: Confirm that, when Phone A performs initial pairing, Phone B can perform subsequent pairing. Also confirm that Phone B can perform initial pairing and Phone A can perform subsequent pairing.
- The subsequent pairing notifications must appear correctly between
non-LE Audio capable phones.
- For example: Confirm that, when Phone B performs initial pairing, Phone C can perform subsequent pairing. Also confirm that Phone C can perform initial pairing and Phone B can perform subsequent pairing.
- The subsequent pairing notifications must appear correctly between a LE
Audio capable phones and a phone supporting multiple, simultaneous LE
Audio connections.
- For example: Confirm that, when Phone A performs initial pairing, Phone D can perform subsequent pairing. Also confirm that Phone D can perform initial pairing and Phone A can perform subsequent pairing.
- The subsequent pairing notifications must appear correctly between LE
Audio and non-LE Audio capable phones.
Place the Bluetooth device 0.3 m away from the phone.
Wait for the device name sync to the account: Go to Settings > Google > Devices & Sharing (or Device Connections) > Devices > Saved Devices to check whether the device name is shown. Return to the home screen once the DUT appears in the phone's device list.
Wait for the subsequent notification pop up.
Measure the time from tapping the subsequent notification on the second phone until you see the notification pop up 'Device connected'.
Record the time in Subsequent section for the second phone.
Clear the saved record by the following steps, which is precondition for the next test.
- Forget the connected device by removing it from the Bluetooth settings list.
Go to Settings > Google > Devices & sharing (or Device connections) > Devices > Saved devices.
- Turn off the 'Automatically save devices'
- Return to the previous page
- Turn On the 'Automatically save devices'
- Verify that you see 'No devices' in the device list like shown:

Turn the device to get into pairing mode.
3.3.2 Expected behavior
- Pairing notification for previously-associated device pops up

- Tap the notification to start subsequent pairing. The notification will show progress:

- When the Fast Pair pairing is completed, you will see the following notification:

- The phone will display an error if Fast Pair pairing fails:

3.4 Test case 3 : Check the BLE account key is still being broadcasted
- Make sure the headset still broadcasts Account Data when it's not discoverable, for example: after initial pairing is completed and connected, unless the headset is powered off.
- Choose a reference phone and test it once for at least 30 minutes.
3.5 Test case 4 : Distance criteria
- Test each distance (0.3m,1.2m and 2m) 10 times individually.
- Record every time a reference phone displays a notification for each distance.
- For example, "0.3 meters - Yes (7/10)", would mean "This reference phone receives the pairing Notification 7 times (out of 10 times) at 0.3 meters"
3.6 How to capture debug log
3.6.1 How to capture debugging information
- To turn on logging and grab the bug report, run the following:
adb logcat -G 16M
Ensure you have turned on "Bluetooth HCI snoop log for debugging". For Pixel phones, this is accomplished by:
- Going to Settings > System > About Phone > Build number.
- Tapping "Build number" 7 times to enable developer options.
 * Going to Settings > System > Advanced > developer options.
* Enabling Developer options and HCI snoop log.
* This option enables the phone to collect the HCI packet log file.
* Toggle airplane mode on and off to ensure the changes are applied.
* Going to Settings > System > Advanced > developer options.
* Enabling Developer options and HCI snoop log.
* This option enables the phone to collect the HCI packet log file.
* Toggle airplane mode on and off to ensure the changes are applied.
3.6.2 How to get logcat log file
- Run
adb devicesto show all the serial number of the devices on the terminal. - Run
adb -s {device serial number} logcat > {logcat name}.txt(You can name your logcat file arbitrarily and logcat multiple devices at the same time). - Reproduce the bug.
- Run
Ctrl+Cto stop the logcat. - Run
adb bugreportto generate a zip file that should contain all of the data. It may take several minutes. - Run the following commands to get btsnoop_hci.log (The devices need to be
rooted).
- For Android O (8.0) or newer:
adb pull data/misc/bluetooth/logs/btsnoop_hci.log - For Android N:
adb pull sdcard/btsnoop_hci.log - If the earlier paths don't contain the hci.log :
adb shell; find hci.logto get the location.
- For Android O (8.0) or newer:
4. Feature Certification Criteria:
Need to pass all test cases, Battery notification is only mandatory for true wireless headset.
4.1 Battery notifications
4.1.1 Show left + right + case battery notification.
Procedure:
- Pair the test phone with the true wireless headset.
- Close case
- Open case and verify.
Verify:
- Battery notification shows 3 images of left, case, right, and the battery levels are correct. (with charging icon on the left and right earbuds)

4.1.2 Battery info should be updated after the battery level changes.
Procedure:
- Pair the test phone with the true wireless headset.
- Use true wireless headset to play any video for 10 min. (To reduce the power.)
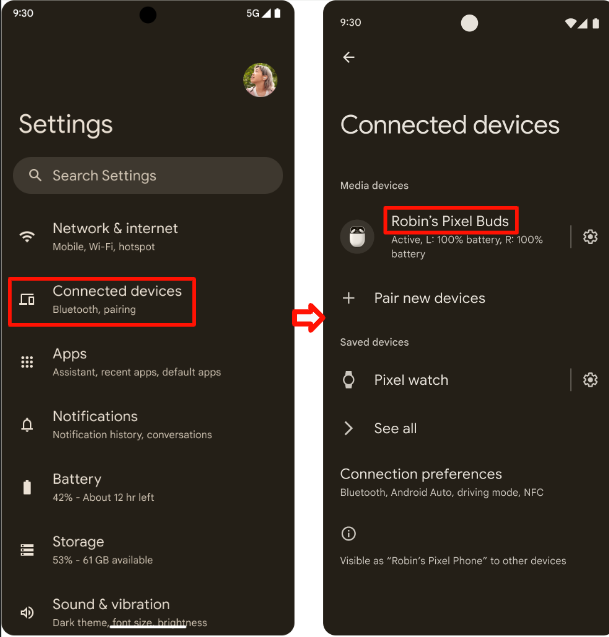
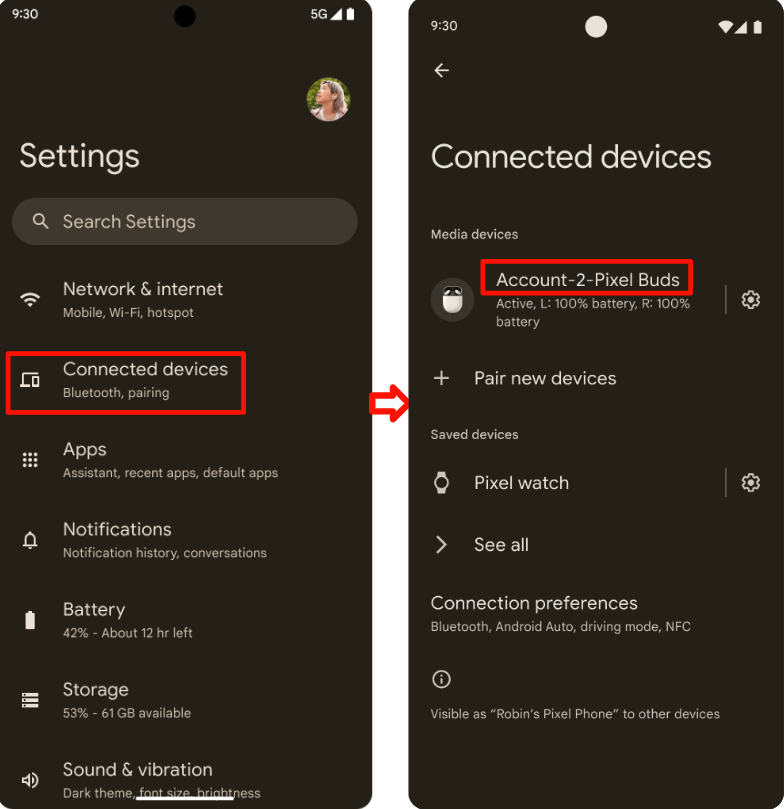
- Go to Settings > Google > Devices & sharing (or Device connections) > Devices > Saved devices > Headset name.
Verify:
- Battery info should be updated after the battery level changes.
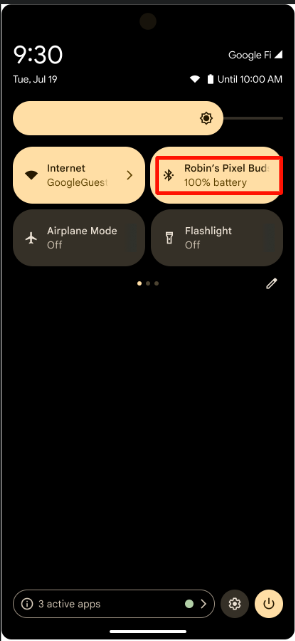
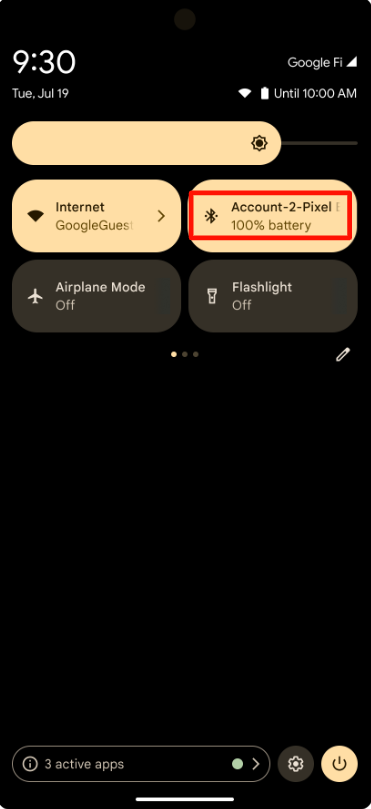
- The battery level should be the same as the battery level reported in the Bluetooth shortcut (Pull down quick setting bar), battery level should align one of the buds level, it's better to show the lowest battery level.

4.1.3 Suppress notification, HUN should be dismissed (Close Case)
Procedure:
- Pair the test phone with the true wireless headset.
- Open case.
- When HUN shows, Close case.
Verify:
- Battery heads up notification dismissed within 3 seconds.

4.2 Personalized Name
4.2.1 Headset base case 1, Phone 1, account A, initial pair
Precondition:
- Phone 1 never paired with the headset (in case phone has the cached alias)
- Factory reset the headset before testing.
Procedure:
- Login Phone 1 with Gmail account A. Pair Phone 1 with the Headset. Don't change the device name after paired.
- Check 3 places shown.
Verify:
- After paired, on the 3 places, phone 1 should show the account A user's first name + headset info. In the form of [User's First Name]'s [Device Name].
Check name in 3 places
Settings > Google > Devices & Sharing > Saved Devices:
Quick Setting Bluetooth icon text (Pull down the quick setting bar):
Bluetooth settings:
4.2.2 Headset base case 2, Phone 2, account B, initial pair > edit device name
Procedure:
- Continue from Headset based case 1 of 3.
- Phone 2, account B, initial paired successfully.
- Check 3 places.
- Go to Bluetooth settings > gear icon > pencil icon > change device name.

Verify:
After pairing, should show account A user's first name + headset info on the following places:
Settings > Google > Devices & Sharing > Saved Devices:
Quick Setting Bluetooth icon text (Pull down the quick setting bar):
Bluetooth settings:
After changing the device name, the new name should appear in the following places:
Settings > Google > Devices & Sharing > Saved Devices:
Quick Setting Bluetooth icon text (Pull down the quick setting bar):
Bluetooth settings:
4.2.3 Headset base case 3, Phone 3, account C, initial pair
Procedure:
- Continue from Headset based case 2 of 3.
- Phone 3, account C, initial paired successfully.
Check the 3 places listed:
Settings > Google > Devices & Sharing > Saved Devices:
Quick Setting Bluetooth icon text (Pull down the quick setting bar):
Bluetooth settings:
Verify :
- Phone 3 should show phone 2's new device name in the same 3 places listed in the earlier Procedure steps.
4.3 Find Device - Ring Headset
4.3.1 Ring device headset function
Procedure:
- Pair phone with headset successfully.
Go to Settings > Google > Devices & sharing (or Device connections) > Devices > Saved devices > Headset name > Find device.
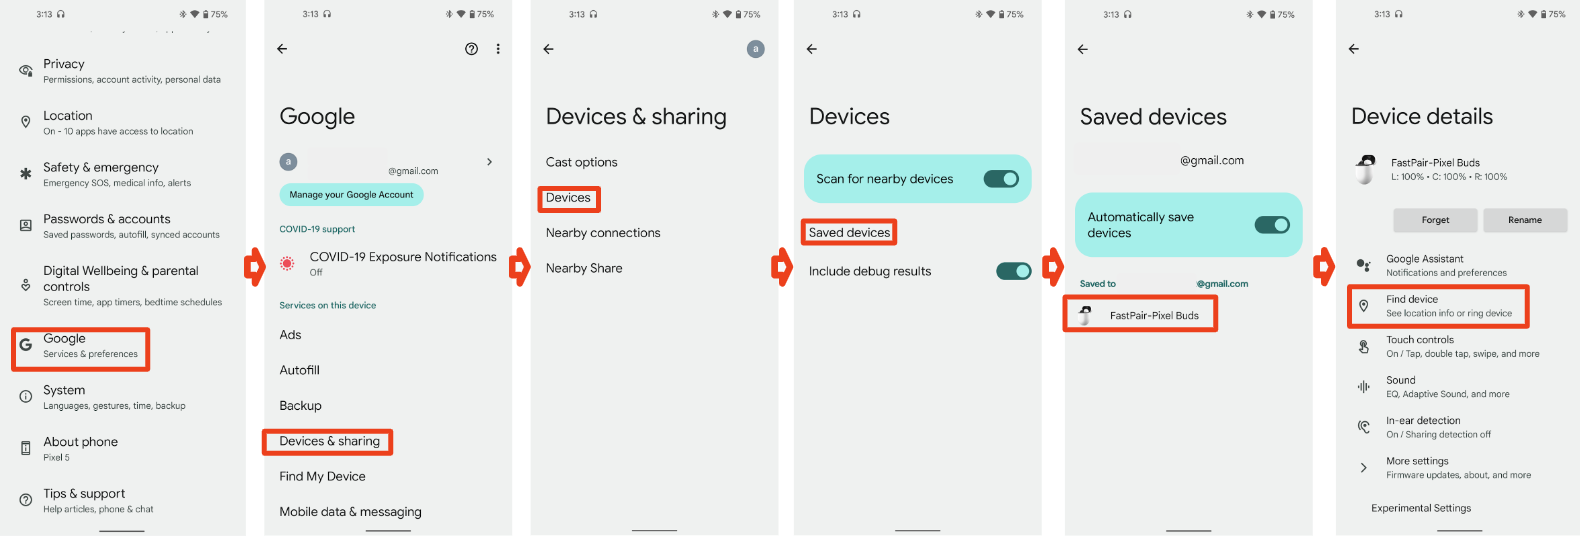
Tap Ring device button.(If test headset have right and left buds, it should show two button for left and right)

Tap Mute device button.
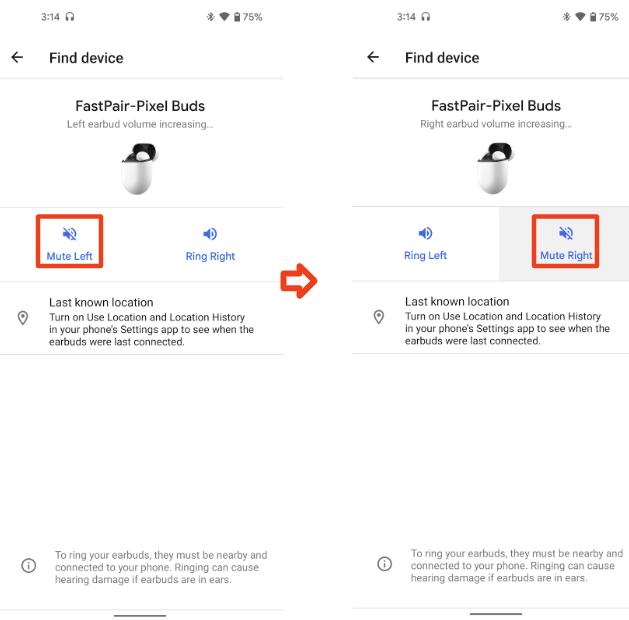
Verify:
- The status under headset name should show "Connected".
- Headset should ring when tap this button with customized ringtone. (True wireless headset should ring corresponding side right/left)
- Headset should mute immediately without any delay.
4.4 Retroactively Write Account Key
4.4.1 Retroactive Pair and Confirm
Procedure:
- Put fast pair device into pairing mode
- You will see a heads-up notification, don't tap it.
- Go to Settings > Connected devices > Pair new device, tap to pair

- Wait for a minute, you'll see a notification for retroactive pair.
- Tap the notification to save the headset to your account.

- Go to Settings > Google > Devices & sharing (or Device connections) > Devices > Saved devices
Verify:
Retroactive Pair notification should show up.
You will see the device is in the saved device list. The device now has full support for Fast Pair.
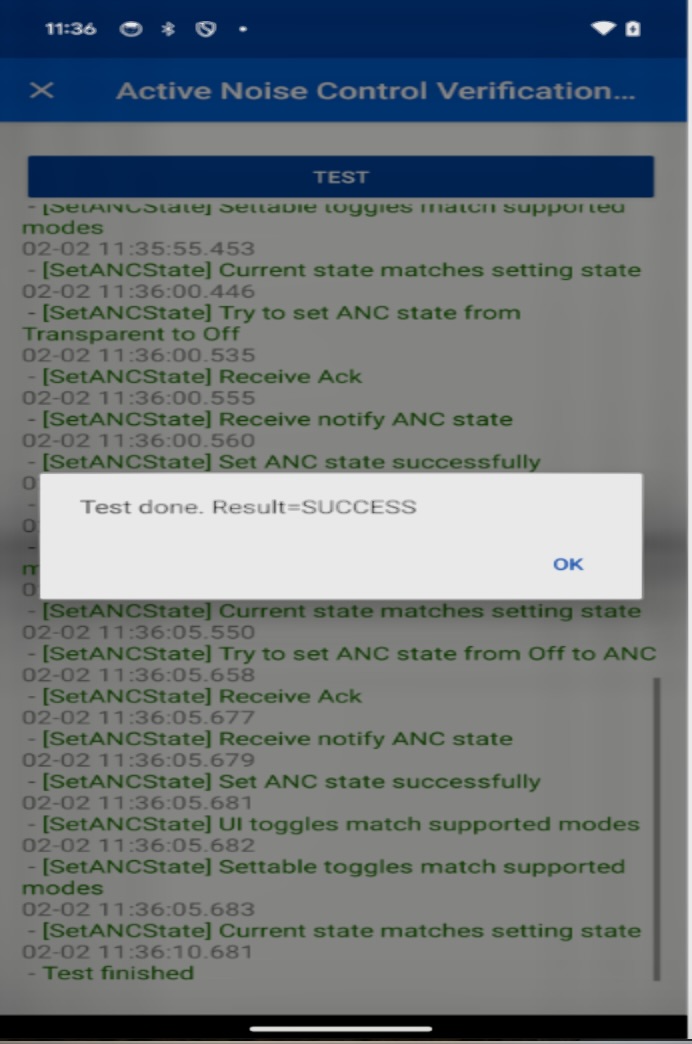
4.5 Active Noise Control
Active Notification Control, ANC, is an optional feature. ,Devices implementing ANC must verify it in Validator app and fill in the results in to their Self-Test Report, but don't need to have the feature certified in a 3rd Party Lab.
4.5.1 Active Noise Control Verification
Procedure:
- In the Validator app, select the mode that the DUT supports.
- Pair the DUT to the Seeker.
- Connect to the DUT from the Seeker.
Verify:
- The Seeker sends ANC state (0x11) to the DUT after pairing.
- The DUT responded with Notify ANC state (0x13) within 3 seconds.
- The Seeker sends ANC state (0x12) for each supported ANC mode.
- The DUT responds with Notify ANC state (0x13) within 5 seconds for every message sent in step 3.
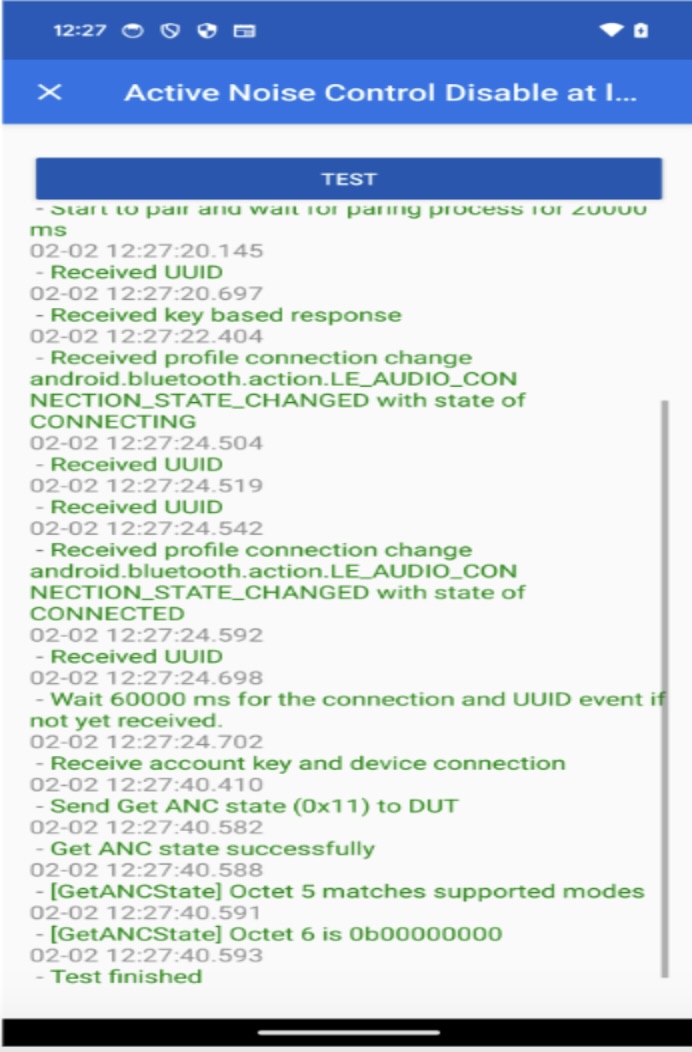
4.5.2 Active Notification Control Disable
Procedure:
- In the Validator app, select the mode that the DUT supports.
- Pair the DUT to the Seeker.
- Connect to the DUT from the Seeker.
Verify:
- The Seeker sends ANC state (0x11) to the DUT after pairing.
- The DUT responded with Notify ANC state (0x13) within 3 seconds.
- Confirm that Octet 5 matches the supported ANC modes for this Seeker.
- Confirm that Octet 6 is 0b00000000