This article is for developers who serve Google scripts from their own server. We recommend enabling region-specific behavior for tags to unlock features such as advanced consent mode, and to control tag behavior based on where your users are.
Before you begin
This guide assumes that you have done the following:
Step 1: Set up the request header
You need to send specific request headers that contain the user's region information, as described in the sections below.
You can directly start at Step 2 if:
- You use App Engine. App Engine sends geo headers automatically.
- You use a different infrastructure provider than the ones listed below. You need to set up custom headers.
Cloud Run with GCP Load Balancer
You can send geolocation information either with all HTTP request headers, or for specific requests. Since adding custom request headers will incur a fee on a per 1 million request basis, we recommend to only include geo information for requests to serve Google scripts. This option initially requires more setup but helps you run your infrastructure as economically as possible.
Script requests
To include the geo headers for only script requests, you need to set up a new backend and create routing rules.
To create a new backend:
- Open GCP load balancer
- In your load balancer, open the Backend configuration
section. Create a new backend service.
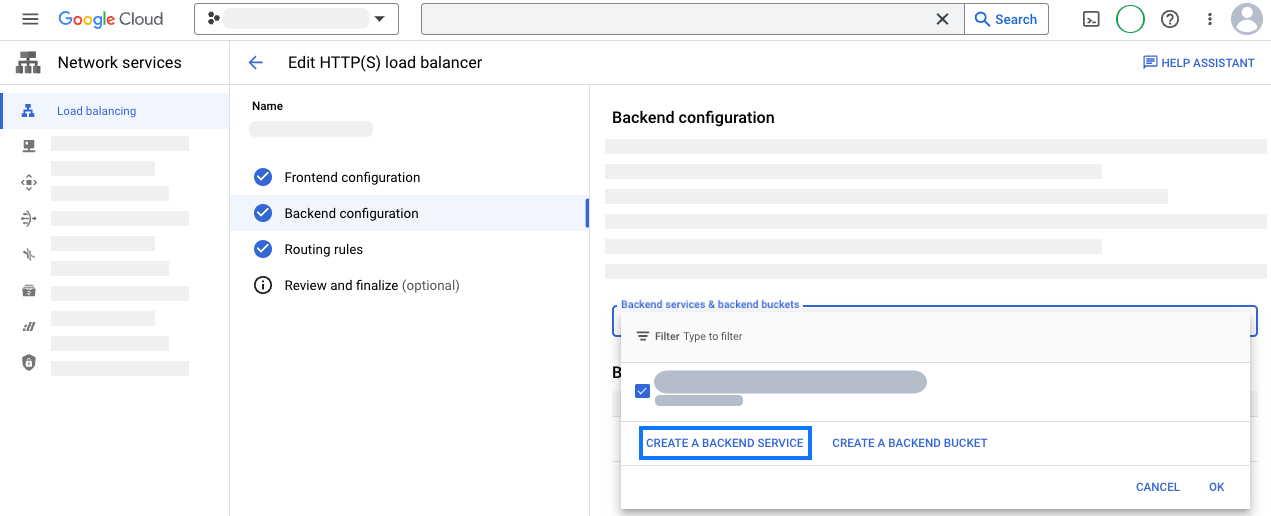
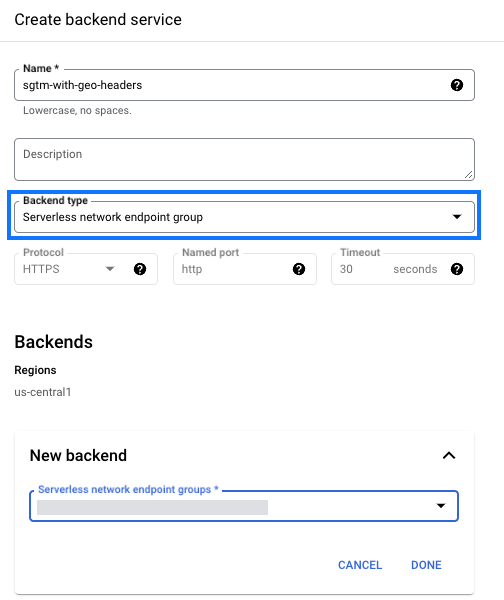
- Configure your new backend service:
- Backend type: choose the network endpoint group type that your application uses. If you use Cloud Run, choose Serverless network endpoint group.
- In New backend, pick the network endpoint group of your
server-side Tag Manager deployment.
- Open the section Advanced configurations. Add the custom request
headers.
Header Name Header Value X-Gclb-Country {client_region} X-Gclb-Region {client_region_subdivision} - Save the new backend service.
To configure routing rules:
- In your load balancer, open the Routing rules section. Choose the mode Advanced host path and rule.
- Update the
pathRulesparameter to mapgtm.js,/gtag/js, and/gtag/destinationto the new backend service.
pathRules:
- paths:
  - /gtm.js
  - /gtag*
  service: projects/project_id/global/backendServices/new backend service
- paths:
  - /*
  service: projects/project_id/global/backendServices/original backend service
- Save your changes.
All requests
To send geolocation information with all HTTP requests, you need to add custom request headers to the existing backend service, see Google Cloud documentation. Create one new custom request headers for each header below:
| Header name | Header Value |
|---|---|
X-Gclb-Country |
{client_region} |
X-Gclb-Country |
{client_region_subdivision} |
GCP Load Balancer
You can send geolocation information either with all HTTP request headers, or for specific requests. Since adding custom request headers will incur a fee on a per 1 million request basis, we recommend to only include geo information for requests to serve Google scripts. This option initially requires more setup but helps you run your infrastructure as economically as possible.
Script requests
To include the geo headers for only script requests, you need to set up a new backend and create routing rules.
To create a new backend:
- Open GCP load balancer
- In your load balancer, open the Backend configuration
section. Create a new backend service.

- Configure your new backend service:
- Backend type: choose the network endpoint group type that your application uses. If you use Cloud Run, choose Serverless network endpoint group.
- In New backend, pick the network endpoint group of your
server-side Tag Manager deployment.

- Open the section Advanced configurations. Add the custom request
headers.
Header Name Header Value X-Gclb-Country {client_region} X-Gclb-Region {client_region_subdivision} - Save the new backend service.
To configure routing rules:
- In your load balancer, open the Routing rules section. Choose the mode Advanced host path and rule.
- Update the
pathRulesparameter to mapgtm.js,/gtag/js, and/gtag/destinationto the new backend service.
pathRules:
- paths:
  - /gtm.js
  - /gtag*
  service: projects/project_id/global/backendServices/new backend service
- paths:
  - /*
  service: projects/project_id/global/backendServices/original backend service
- Save your changes.
All requests
To send geolocation information with all HTTP requests, you need to add custom request headers to the existing backend service, see Google Cloud documentation. Create one new custom request headers for each header below:
| Header name | Header Value |
|---|---|
X-Gclb-Country |
{client_region} |
X-Gclb-Country |
{client_region_subdivision} |
Amazon Web Services (AWS) CloudFront
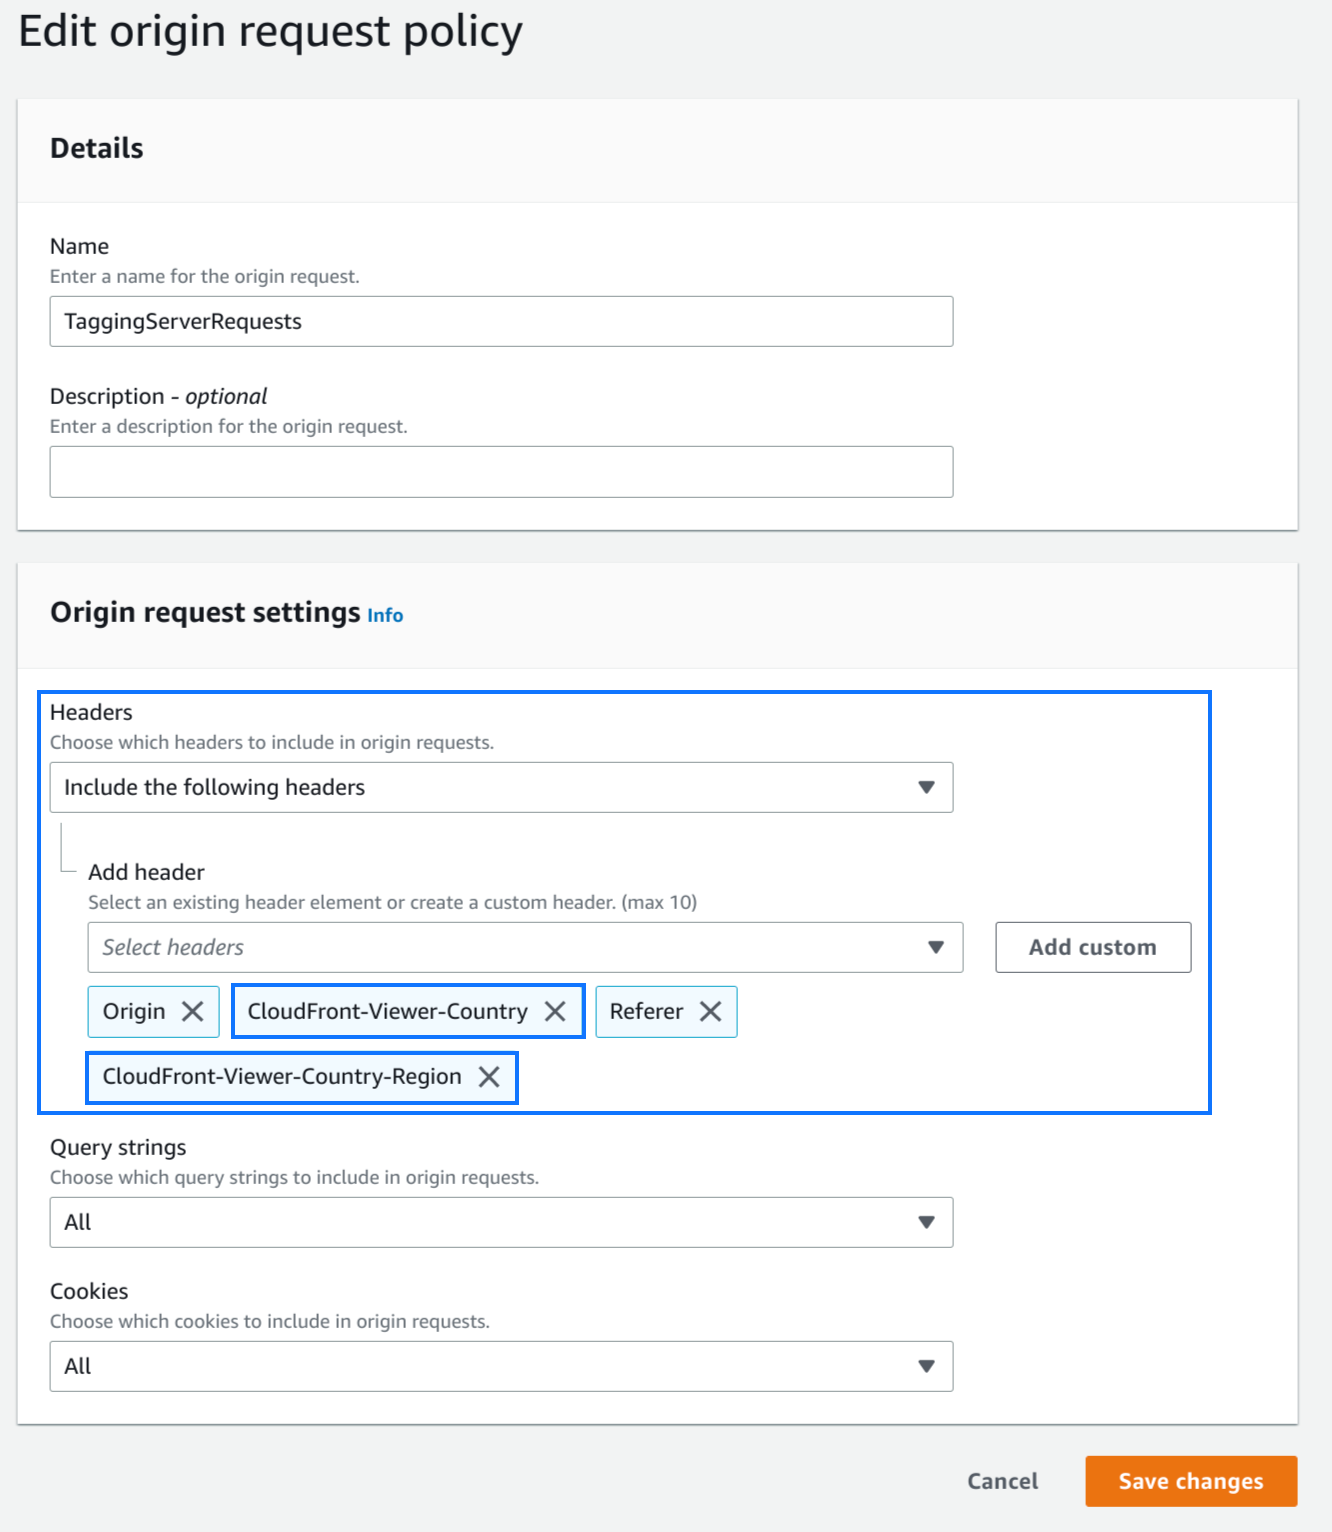
Create an origin
request policy to add the CloudFront-Viewer-Country and
CloudFront-Viewer-Country-Region header to the request.
This will automatically add the following headers along with their values:
| Header Name | Header Value |
|---|---|
| CloudFront-Viewer-Country | The user's country |
| CloudFront-Viewer-Country-Region | The user's subdivision |
Azure Front Door
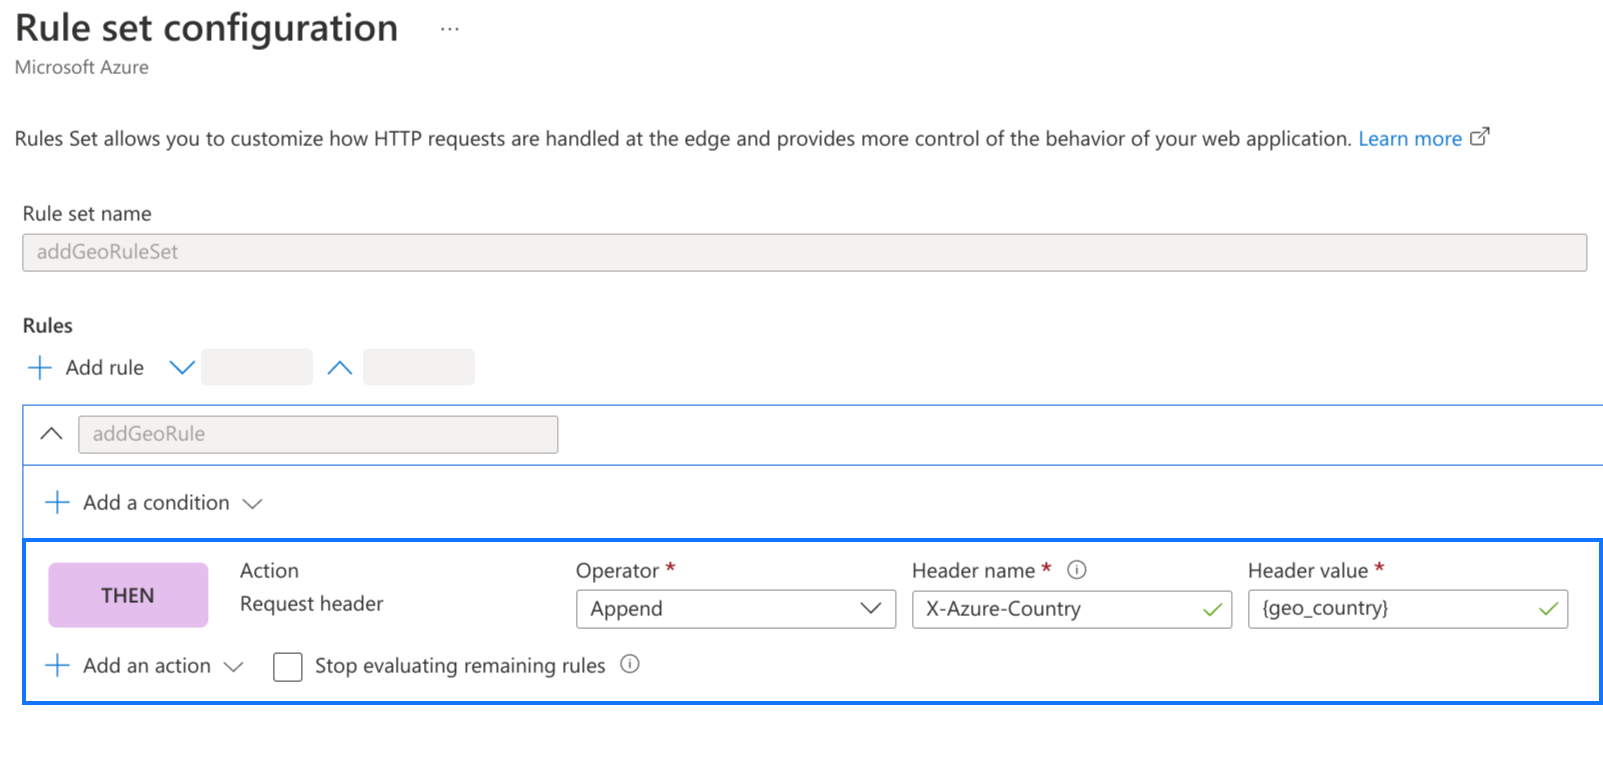
Using the Rules Engine, create a rule set with the modify request header action with the following mapping:
| Header Name | Header Value |
|---|---|
| X-Azure-Country | {geo_country} |
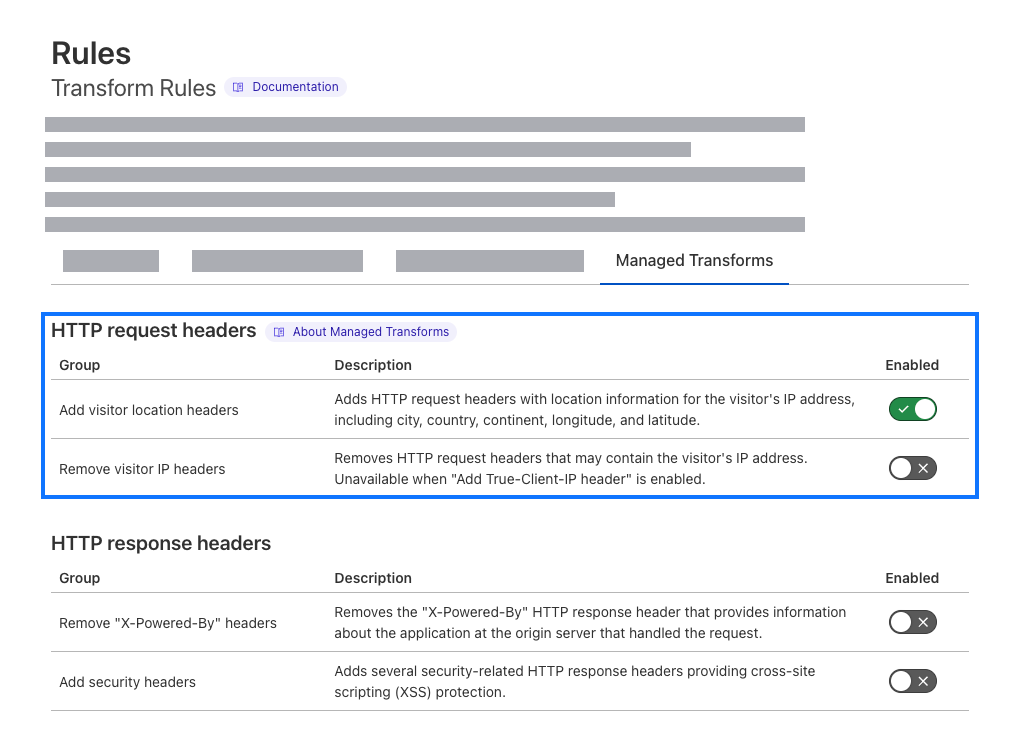
Cloudflare
Enable the "Add visitor location headers" in the managed transforms section:
This will automatically add the following header along with its value:
| Header Name | Header Value |
|---|---|
| CF-IPCountry | The user's country |
Step 2: Set up the Visitor Region variable
If you have set up geo headers as specified above, Tag Manager automatically detects the region or country by reading the HTTP request header. Alternatively, you can set up custom headers.
Automatic detection
- Open Google Tag Manager
- Open your server container.
- In the Variables menu, Configure the list of built-in variables.
- Select Visitor Region.
The geo headers will now be available to use in the Visitor Region variable.
Custom headers
- Open Google Tag Manager
- Open your server container.
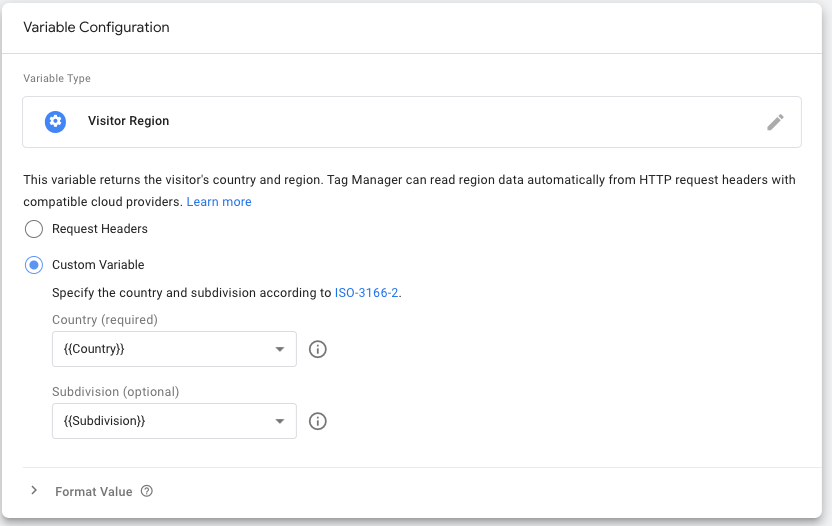
- In the Variables menu, create a New user-defined variable of the type Visitor Region.
- In the Variable Configuration, choose Custom Variable.
In the Variables menu, create two new Request header variables: One for your country and one for subdivision code. Fill the values with the country codes in your HTTP request header(s).
Use the your created variables in the Visitor Region variable as shown in the screenshot.
Name your variable and Save it.
Step 3: Enable region-specific settings in your client
In order to use the visitor region for processing incoming HTTP requests, you have to add it to you client.
Select the client or create a new client you want to apply region setting to. Supported clients are:
- Google Tag Manager: Web container
- Google Analytics: GA4
If you are configuring GA4 clients, check the box Default gtag.js paths for specific IDs and enter the measurement ID of your web container.
Check Enable region-specific settings. Add the {{Visitor Region}} variable that you created in the previous step to the Region field.
Save your client.
Step 4: Verify that region settings apply
To test if your settings work:
- Open Preview mode for your server container.
- Load your website while using first-party serving.
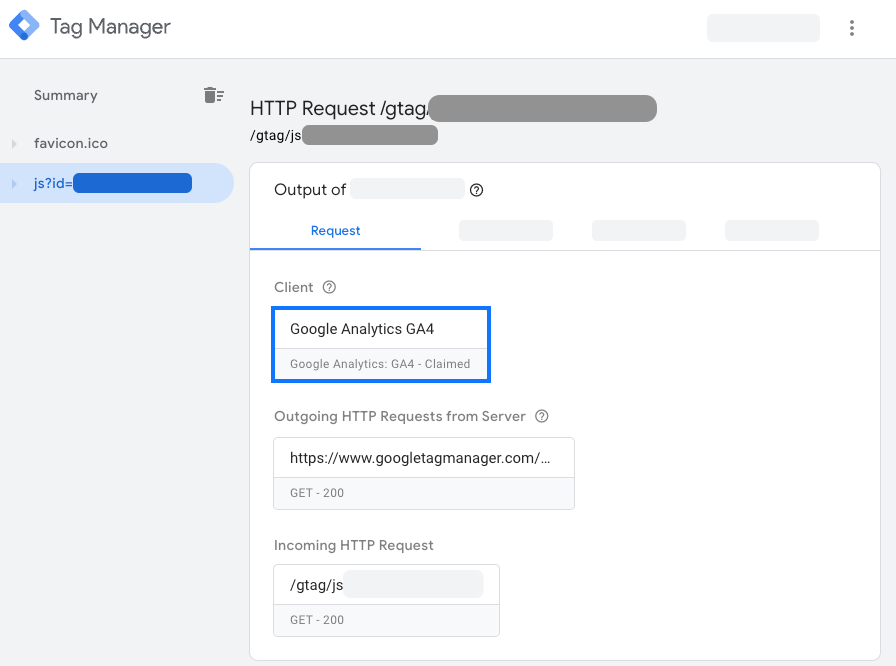
- In the preview window, click on the Claimed Google Analytics GA4
client.
- To see the actual region, change the Display Variables radio button to
values.
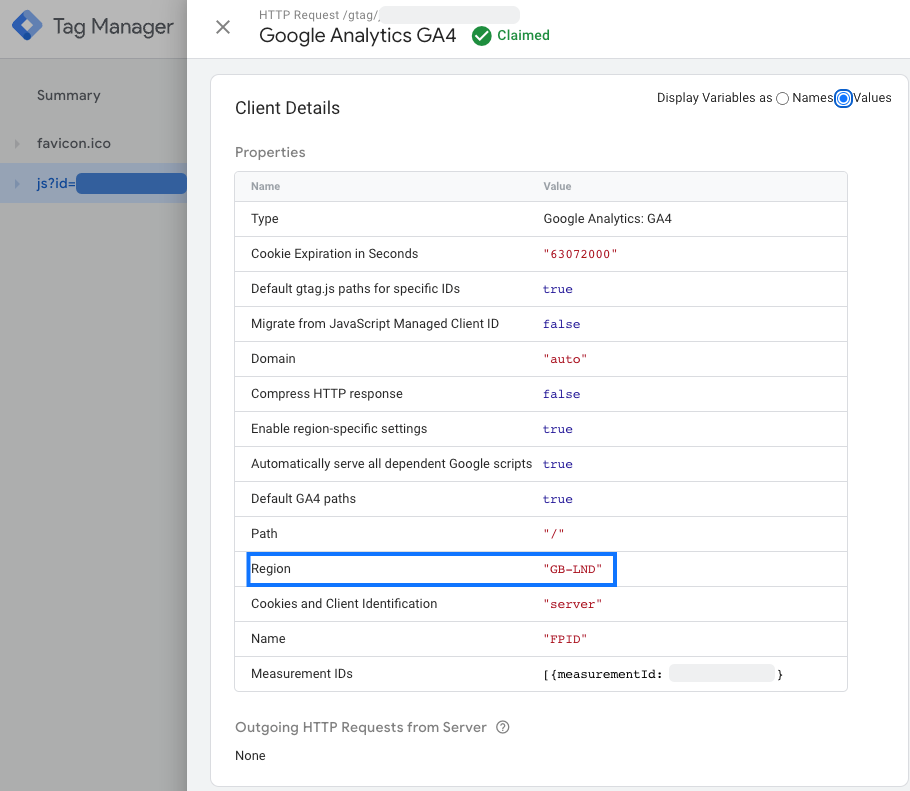
- ✅ Your implementation is correct if the Region property displays a country code.
- ❌ If the Region property displays
undefinedor is missing, your server isn't receiving any region data. Check if the server's HTTP headers are set up according to the predefined variables Google Tag Manager is looking for, see Set up the request header.