This page describes the marker clustering utility that's available in the utility library for the Maps SDK for iOS.
By clustering your markers, you can put a large number of markers on a map without making the map hard to read. The marker clustering utility helps you manage multiple markers at different zoom levels.
When a user views the map at a high zoom level, the individual markers show on the map. When the user zooms out, the markers gather together into clusters, to make viewing the map easier.
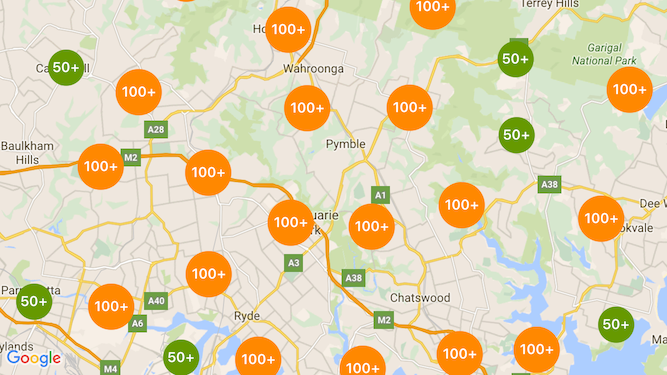
The following screenshot shows the default style of marker clusters:

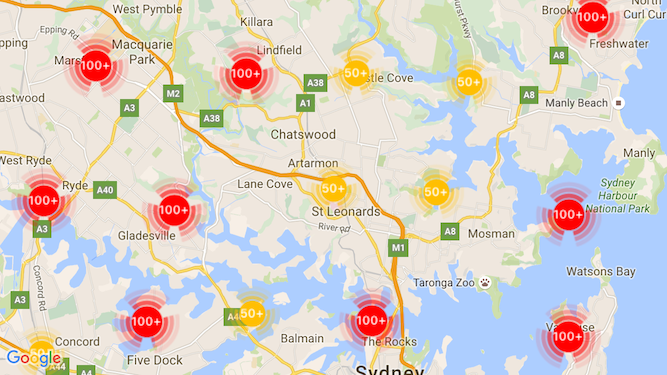
Below is an example of custom marker clusters:

Prerequisites and notes
Maps SDK for iOS Utility Library
The marker clustering utility is part of the Maps SDK for iOS Utility Library. If you haven't yet set up the library, follow the setup guide before reading the rest of this page.
For best performance, the recommended maximum number of markers is 10,000.
Location permission
This example uses the device's GPS to locate the user and the map on their coordinates. To enable
this, you must add a description to the NSLocationWhenInUseUsageDescription permission
in the project's Info.plist file.
To add this, do the following:
- Click the
Info.plistfile in the Project Navigator in Xcode to open the Property List Editor. - Click the '+' icon next to 'Information Property List' to add a new property.
- In the 'key' field, type 'NSLocationWhenInUseUsageDescription'. Xcode will automatically translate this to the long name 'Privacy - Location When In Use Usage Description'. For a complete list of possible location permission properties, see Requesting Authorization for Location Services in the Apple Developer documentation.
- Leave the 'Type' field set to 'String'.
- In the 'Value' field, type a description of the reason your app requires the use of the user's location. For example, "Locates the user to provide nearby business listings."
Implementing marker clustering
Implementing marker clustering takes three steps:
- Create a cluster manager instance.
- Pass the markers you want to cluster to the cluster manger.
- Invoke the cluster manager.
Creating the cluster manager
To use the cluster manager, do the following:
- Set the
ViewControllerwhere your map is rendered to conform to theGMSMapViewDelegateprotocol. - Create an instance of
GMUClusterManager. - Pass the the instance of
GMSMapViewyou want to implement marker clustering in and implementations of the following protocols to theGMUClusterManagerinstance:GMUClusterIconGenerator: Provides application logic that fetches the cluster icons to be used at different zoom levels.GMUClusterAlgorithm: Specifies an algorithm that determines the behavior of how markers are clustered, such as the distance between markers to include in the same cluster.GMUClusterRenderer: Provides application logic that handles the actual rendering of the cluster icons on the map.
- Set the map delegate on the
GMUClusterManagerinstance.
The utility library includes default implementations of the icon generator (GMUDefaultClusterIconGenerator),
algorithm (GMUNonHierarchicalDistanceBasedAlgorithm) and renderer (GMUDefaultClusterRenderer).
You may optionally create your own custom clustrering icon genertator, algorithm and renderer.
The following code creates a cluster manager using these defaults in the viewDidLoad
callback of ViewController:
Swift
import GoogleMaps
import GoogleMapsUtils

class MarkerClustering: UIViewController, GMSMapViewDelegate {
  private var mapView: GMSMapView!
  private var clusterManager: GMUClusterManager!

  override func viewDidLoad() {
    super.viewDidLoad()

    // Set up the cluster manager with the supplied icon generator and
    // renderer.
    let iconGenerator = GMUDefaultClusterIconGenerator()
    let algorithm = GMUNonHierarchicalDistanceBasedAlgorithm()
    let renderer = GMUDefaultClusterRenderer(mapView: mapView,
                                clusterIconGenerator: iconGenerator)
    clusterManager = GMUClusterManager(map: mapView, algorithm: algorithm,
                                                      renderer: renderer)

    // Register self to listen to GMSMapViewDelegate events.
    clusterManager.setMapDelegate(self)
    // ...
  }
  // ...
}
Objective-C
@import GoogleMaps;
@import GoogleMapsUtils;

@interface MarkerClustering () <GMSMapViewDelegate>

@end

@implementation MarkerClustering {
  GMSMapView *_mapView;
  GMUClusterManager *_clusterManager;
}

- (void)viewDidLoad {
  [super viewDidLoad];

  // Set up the cluster manager with a supplied icon generator and renderer.
  id<GMUClusterAlgorithm> algorithm =
      [[GMUNonHierarchicalDistanceBasedAlgorithm alloc] init];
  id<GMUClusterIconGenerator> iconGenerator =
      [[GMUDefaultClusterIconGenerator alloc] init];
  id<GMUClusterRenderer> renderer =
      [[GMUDefaultClusterRenderer alloc] initWithMapView:_mapView
                                    clusterIconGenerator:iconGenerator];
  _clusterManager =
      [[GMUClusterManager alloc] initWithMap:_mapView
                                   algorithm:algorithm
                                    renderer:renderer];

  // Register self to listen to GMSMapViewDelegate events.
  [_clusterManager setMapDelegate:self];
  // ...
}
// ...
@end
Adding markers
There are two ways to add markers to the marker clusterer: individually or as an array.
Individual marker
Swift
let position = CLLocationCoordinate2D(latitude: 47.60, longitude: -122.33)
let marker = GMSMarker(position: position)
clusterManager.add(marker)
Objective-C
CLLocationCoordinate2D position = CLLocationCoordinate2DMake(47.60, -122.33);
GMSMarker *marker = [GMSMarker markerWithPosition:position];
[_clusterManager addItem:marker];
Array of markers
Swift
let position1 = CLLocationCoordinate2D(latitude: 47.60, longitude: -122.33)
let marker1 = GMSMarker(position: position1)

let position2 = CLLocationCoordinate2D(latitude: 47.60, longitude: -122.46)
let marker2 = GMSMarker(position: position2)

let position3 = CLLocationCoordinate2D(latitude: 47.30, longitude: -122.46)
let marker3 = GMSMarker(position: position3)

let position4 = CLLocationCoordinate2D(latitude: 47.20, longitude: -122.23)
let marker4 = GMSMarker(position: position4)

let markerArray = [marker1, marker2, marker3, marker4]
clusterManager.add(markerArray)
Objective-C
CLLocationCoordinate2D position1 = CLLocationCoordinate2DMake(47.60, -122.33);
GMSMarker *marker1 = [GMSMarker markerWithPosition:position1];

CLLocationCoordinate2D position2 = CLLocationCoordinate2DMake(47.60, -122.46);
GMSMarker *marker2 = [GMSMarker markerWithPosition:position2];

CLLocationCoordinate2D position3 = CLLocationCoordinate2DMake(47.30, -122.46);
GMSMarker *marker3 = [GMSMarker markerWithPosition:position3];

CLLocationCoordinate2D position4 = CLLocationCoordinate2DMake(47.20, -122.23);
GMSMarker *marker4 = [GMSMarker markerWithPosition:position4];

NSArray<GMSMarker *> *markerArray = @[marker1, marker2, marker3, marker4];
[_clusterManager addItems:markerArray];
Invoking the marker clusterer
Once you have created your marker clusterer and passed it the markers you wish to cluster, all
you have to do is call the cluster method on your marker clusterer instance.
Swift
clusterManager.cluster()
Objective-C
[_clusterManager cluster];
Handle events on markers and clusters
In general when using the Maps SDK for iOS, to listen to events on the map you must implement
the GMSMapViewDelegate
protocol. You can listen to
map events, but you can't
listen to the type-safe cluster manager events. When the user taps a marker,
an individual cluster item, or a cluster, the API triggers
mapView:didTapMarker: and attaches the extra cluster data to the
marker.userData property. You can then check if the userData conforms to
the GMUCluster protocol to determine if a cluster icon or a marker was tapped.
Swift
func mapView(_ mapView: GMSMapView, didTap marker: GMSMarker) -> Bool {
  // center the map on tapped marker
  mapView.animate(toLocation: marker.position)
  // check if a cluster icon was tapped
  if marker.userData is GMUCluster {
    // zoom in on tapped cluster
    mapView.animate(toZoom: mapView.camera.zoom + 1)
    NSLog("Did tap cluster")
    return true
  }

  NSLog("Did tap a normal marker")
  return false
}
Objective-C
- (BOOL)mapView:(GMSMapView *)mapView didTapMarker:(GMSMarker *)marker {
  // center the map on tapped marker
    [_mapView animateToLocation:marker.position];
    // check if a cluster icon was tapped
    if ([marker.userData conformsToProtocol:@protocol(GMUCluster)]) {
      // zoom in on tapped cluster
      [_mapView animateToZoom:_mapView.camera.zoom + 1];
      NSLog(@"Did tap cluster");
      return YES;
    }

    NSLog(@"Did tap marker in cluster");
    return NO;
}
The cluster manager now intercepts any events that you've implemented on
clusterManager. It forwards any remaining events to the map
delegate, if provided. Note that events for standard markers
(that is, markers not generated by the cluster renderer) are always forwarded
to the map delegate.
Customize marker clustering
You can provide a custom implementation for the
GMUClusterRenderer, GMUClusterIconGenerator, or
GMUClusterAlgorithm. You can base your custom implementation
on the sample implementation of these protocols included in the utility
library, or you can code a fully custom implementation by fulfilling the
protocols.
